Lab 5 — Detection Logic using DLP Engine
Switch to Lab Tenant (Tenant 2)
Module 2 starts here. Log out of the Enterprise Tenant and log in using your Lab Tenant credentials (ZIdentity URL from your email). Use your updated password — not the one-time password.
Dependency: The DLP dictionary and engine created in this lab are referenced in Labs 6, 7, and 8. Complete all steps before moving to the next lab.
Build custom detection logic — dictionaries and engines — that will be reused across all protection policies in Labs 6, 7, and 8.
Step 1: Navigate to DLP Dictionaries and Review Predefined Dictionaries
Policies → Data Protection → Common Resources → Dictionaries & Engines
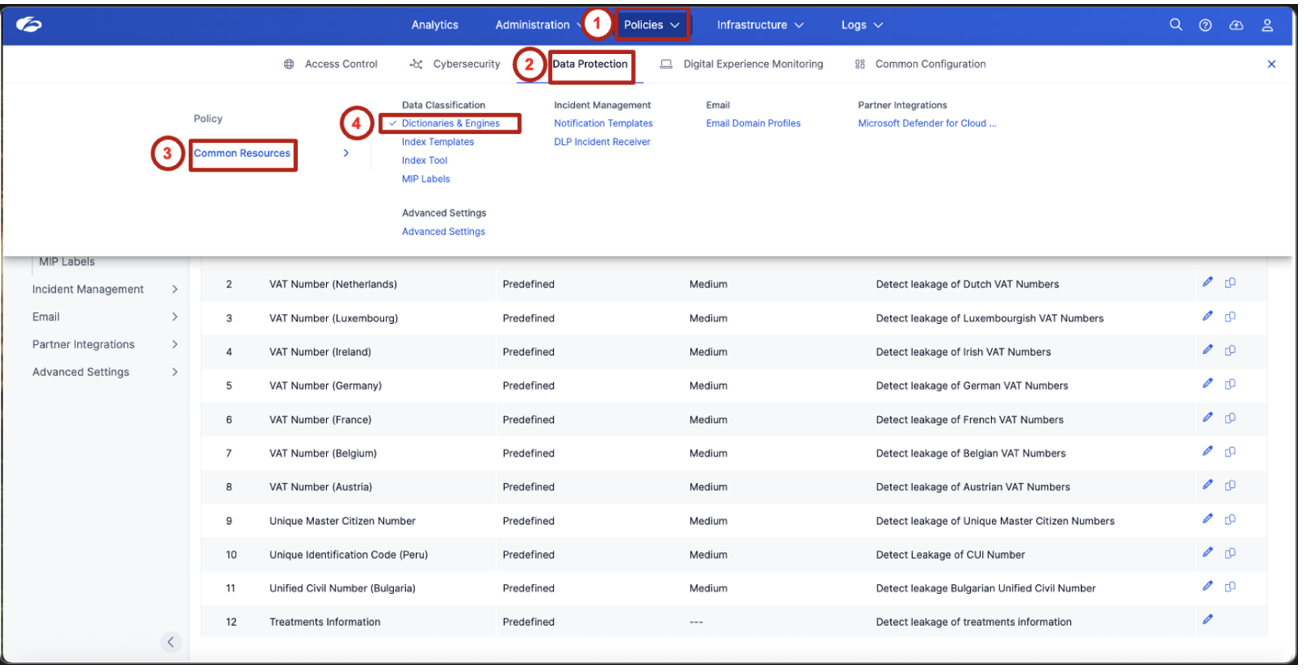
Review the list of predefined dictionaries. Locate and observe the following three dictionaries used in this lab:
- Credit Cards
- Social Security Numbers (US)
- ABA Bank Routing Number
These predefined dictionaries provide built-in detection capabilities for commonly regulated data types — no configuration required to get started with standard compliance frameworks.
Step 2: Modify Predefined Dictionaries to High Confidence
Update predefined dictionaries to use High Confidence scoring and extended proximity for more accurate detection.
For each of the three predefined dictionaries — Credit Cards, Social Security Numbers (US), and ABA Bank Routing Number — open the dictionary and update the following settings:
| Setting | Value |
|---|---|
| Confidence Score Threshold | High |
| Proximity Length | 200 characters |
Save each dictionary after making the changes.
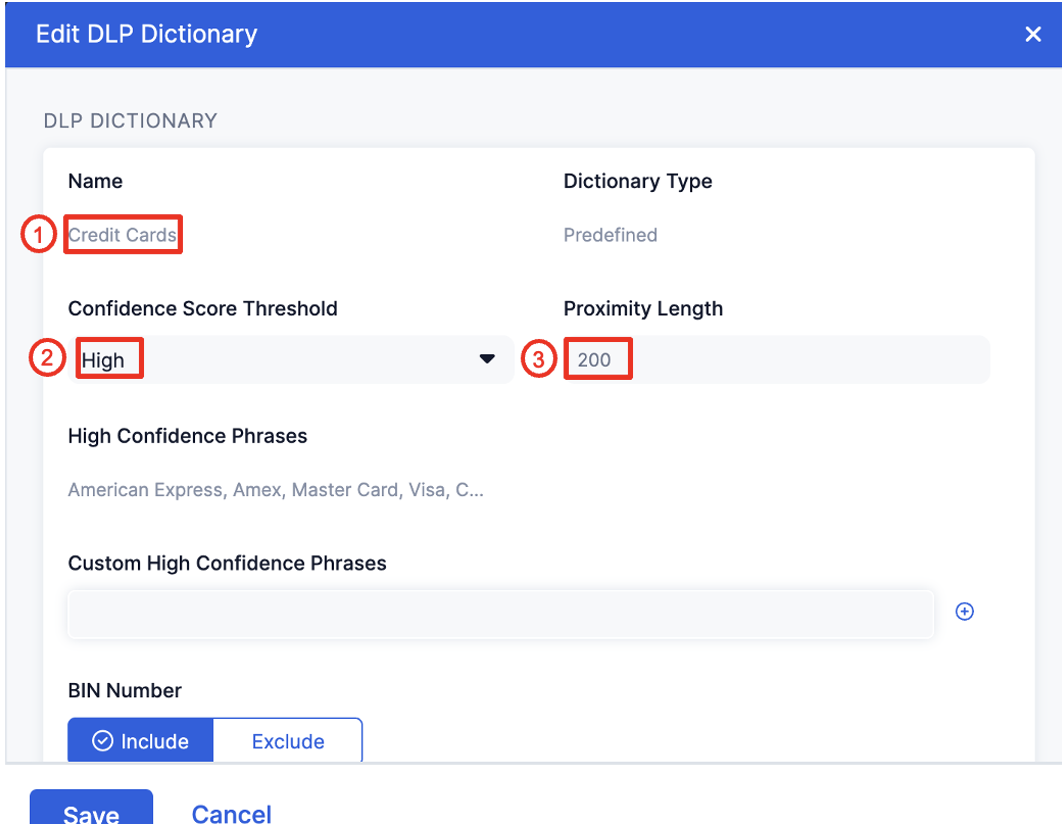
Explain that increasing proximity from the default (50) to 200 means the system looks at a wider window of surrounding text to confirm context. A credit card number appearing within 200 characters of keywords like "card number", "payment", or "billing" has much higher confidence than one appearing in isolation. High Confidence combined with wider proximity reduces false positives in real-world payroll and financial documents.
Step 3: Create a Custom DLP Dictionary
Build custom detection logic for organization-specific sensitive data.
Click Add DLP Dictionary and configure with the following settings.
| Field | Value |
|---|---|
| Name | DP Project Code |
| Dictionary Type | Patterns & Phrases |
| Enable Proximity | Enabled |
| Proximity Length | 200 |
Add the following detection patterns:
Set the action to Count Unique.
Then add the following contextual phrases:
- Confidential
- Internal Only
- Salary
- Payroll
- Project Codes
- Internal

Custom dictionaries allow organizations to detect proprietary identifiers that are not covered by standard compliance templates — project codes, internal classifications, or domain-specific terminology unique to your business.
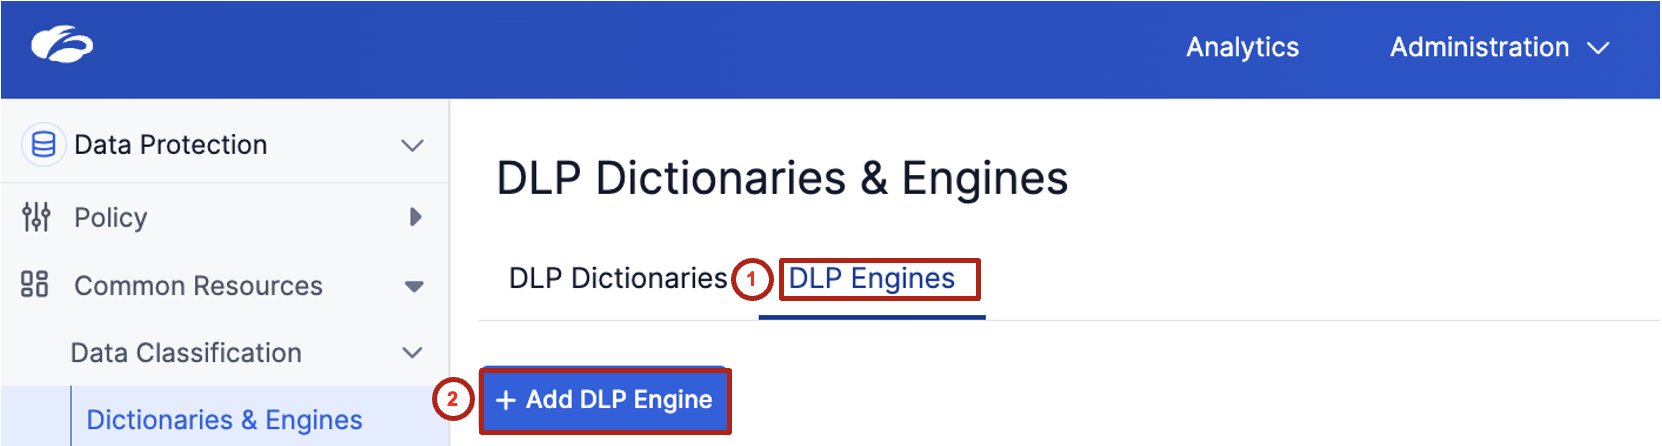
Step 4: Create a Detection Logic using a DLP Engine
Combine multiple detection signals into a single classification rule.
Switch to the DLP Engines tab, then click + Add DLP Engine.
| Field | Value |
|---|---|
| Name | DP Project Code |
| Operator | ALL |
Add the following detection components, each with condition > 0:
- Credit Cards
- Social Security Numbers (US)
- ABA Bank Routing Number
- DP Project Code

Review the expression preview. It should display:
((Credit Cards > 0) AND (Social Security Numbers (US) > 0) AND (ABA Bank Routing Number > 0) AND (DP Project Code > 0))
This logic represents a high-confidence detection scenario where multiple sensitive data elements appear together — exactly the pattern you'd expect in a payroll file like Dataparity_Q2_2025_Payroll_Report.docx.
Emphasize the separation of detection and enforcement — this engine can be reused across Labs 6, 7, and 8 without reconfiguration. Tune detection once, apply everywhere.
Step 5: Understand How Detection Logic Supports Enforcement
Connect detection logic to future protection scenarios.
This detection logic will be reused in the following labs:
| Lab | Channel | Action |
|---|---|---|
| Lab 6 | Web | Block sensitive data uploads |
| Lab 7 | Endpoint | Prevent exfiltration to removable media |
| Lab 8 | Browser | Control copy and paste |
- Why is it important to combine multiple detection signals instead of relying on a single identifier?
- How does proximity detection reduce false positives?
- What types of organization-specific identifiers should be added to custom dictionaries?
- How does this detection logic support consistent protection across Web and Endpoint environments?
Detection logic defines what is sensitive. Policies define what to do about it.
Once created, the same logic can be reused across multiple enforcement channels to provide consistent data protection across Web, Endpoint, and Browser environments — no duplication, no drift.
Transition line: "The system now knows what sensitive data looks like. In Lab 6, we'll use that to stop it from leaving the organization via the web."
If attendees ask why ALL vs. ANY — ALL is intentionally high-confidence to minimize false positives for a block action. ANY would cast a wider net and is better suited for an alert-only policy.