Lab Setup & Prerequisites
Complete these steps before starting Lab 1. You will access your lab VM, log into both Zscaler tenants, configure the Zscaler Client Connector forwarding profile, and verify notifications are enabled. Allow 15 minutes.
All access details — Skytap VM link, tenant usernames, and passwords — were sent to you by the Zscaler Training Team before the session. Keep that email open throughout the lab.
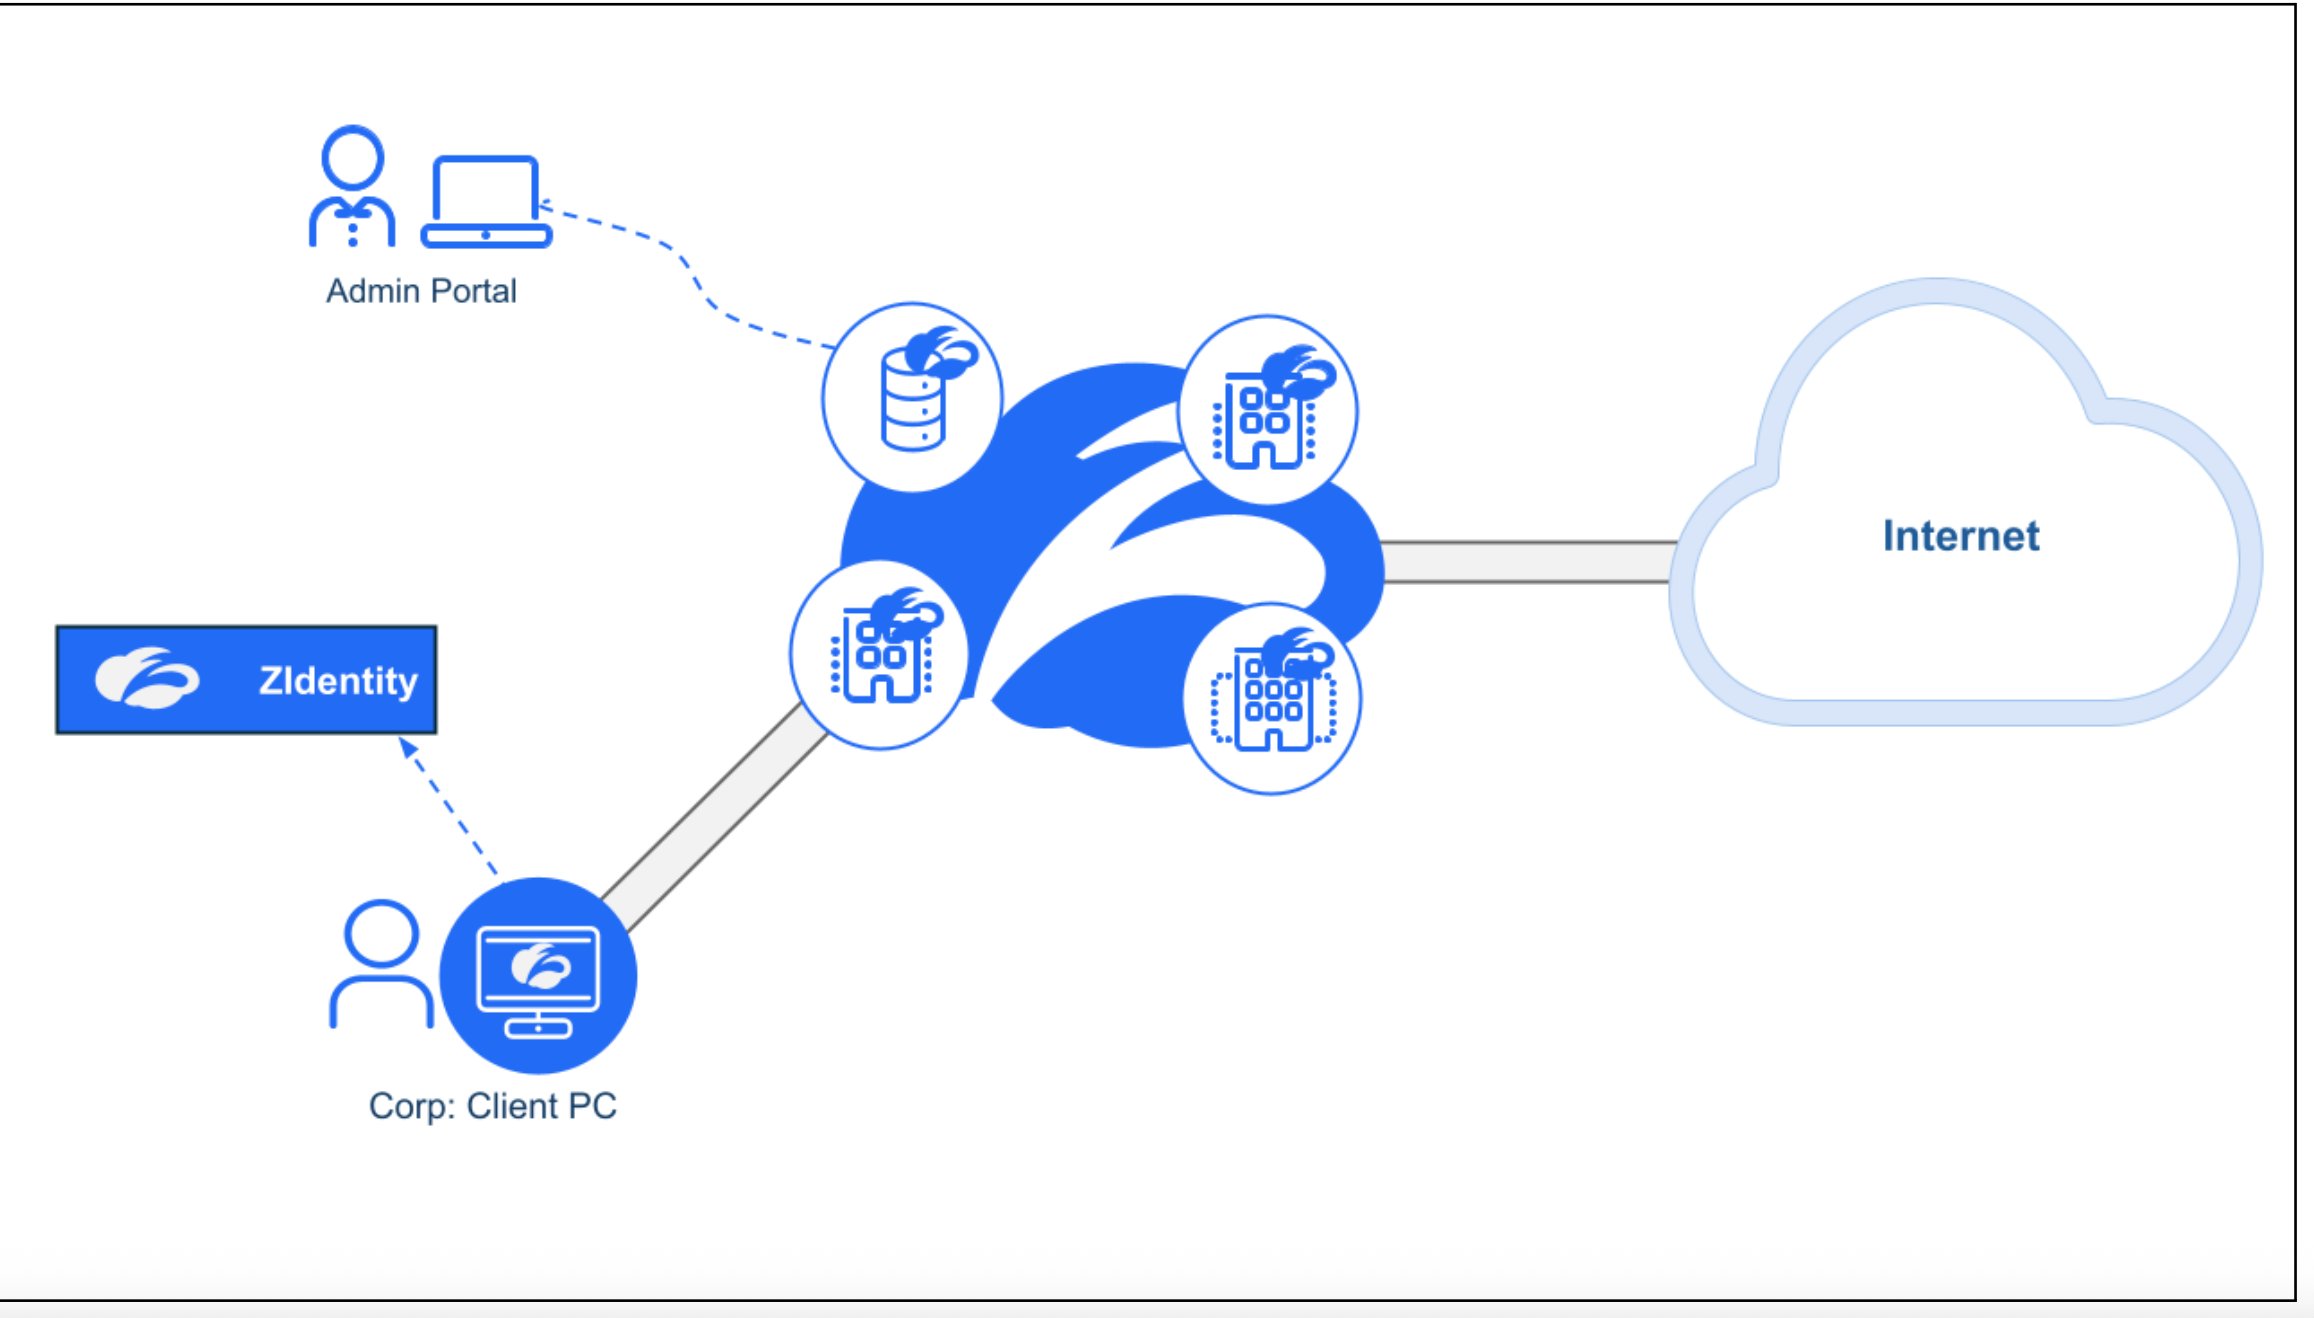
Lab Environment Overview
Your lab environment consists of two components:
| Component | Description |
|---|---|
| Corp Client PC | A Windows VM hosted in Skytap. Used for all Kevin (end user) tasks in Labs 6, 7, and 8. |
| Admin Portal | The Zscaler console accessed from your own laptop. Used for all Alex and Priya tasks. |
| Zscaler Cloud | Your traffic and DLP enforcement plane. ZCC on the VM routes all traffic through Zscaler. |
Part 1 — Access Your Lab Environment
Step 1 — Check Your Email
Look for an email from Zscaler Training Team with subject Data Security (EDU-220) - Instructor Led Training.
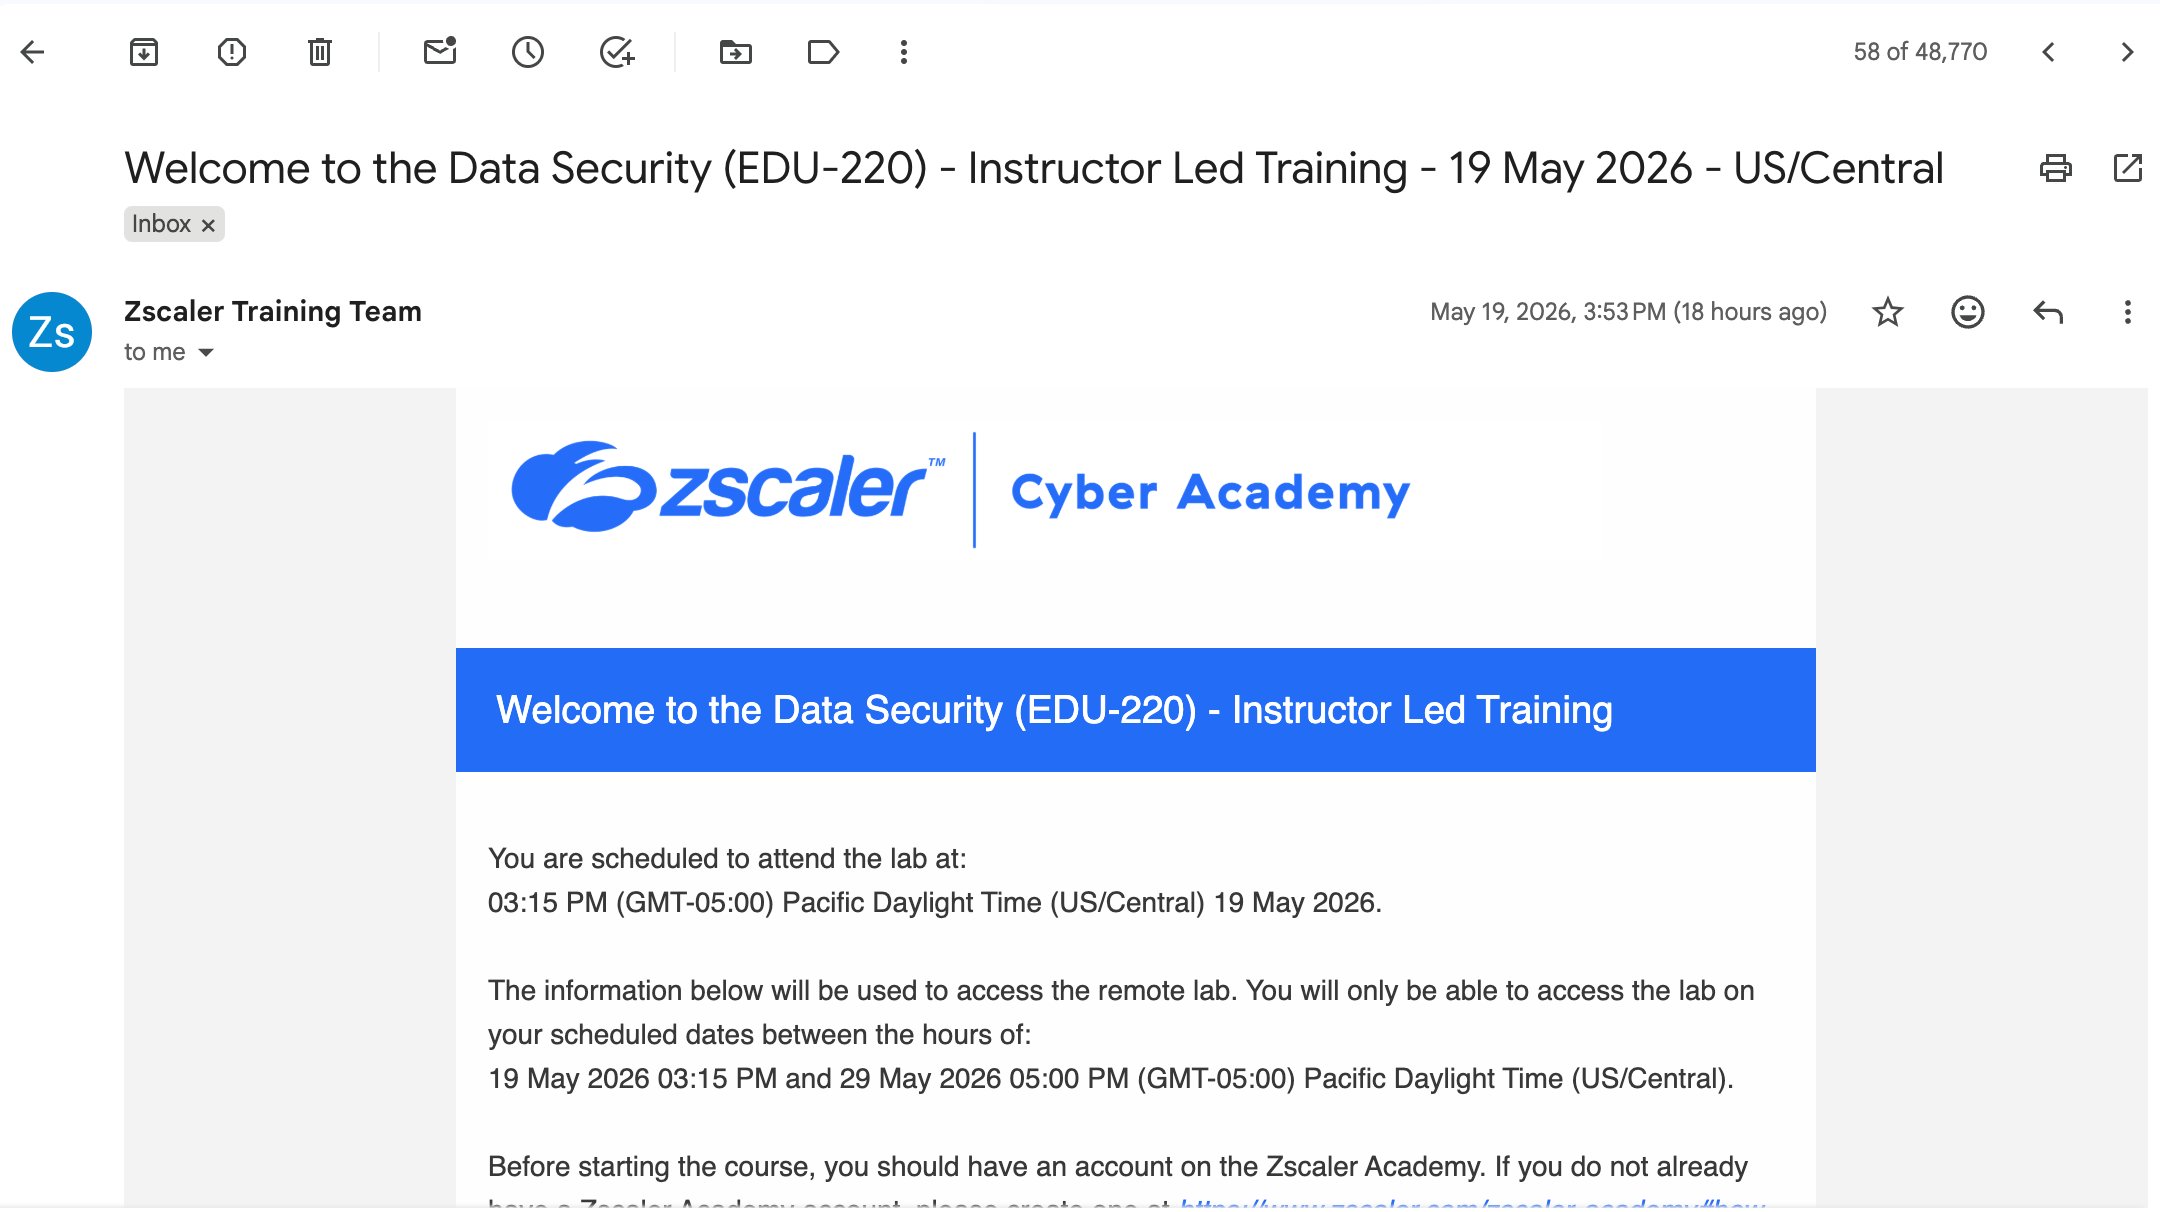
The email contains:
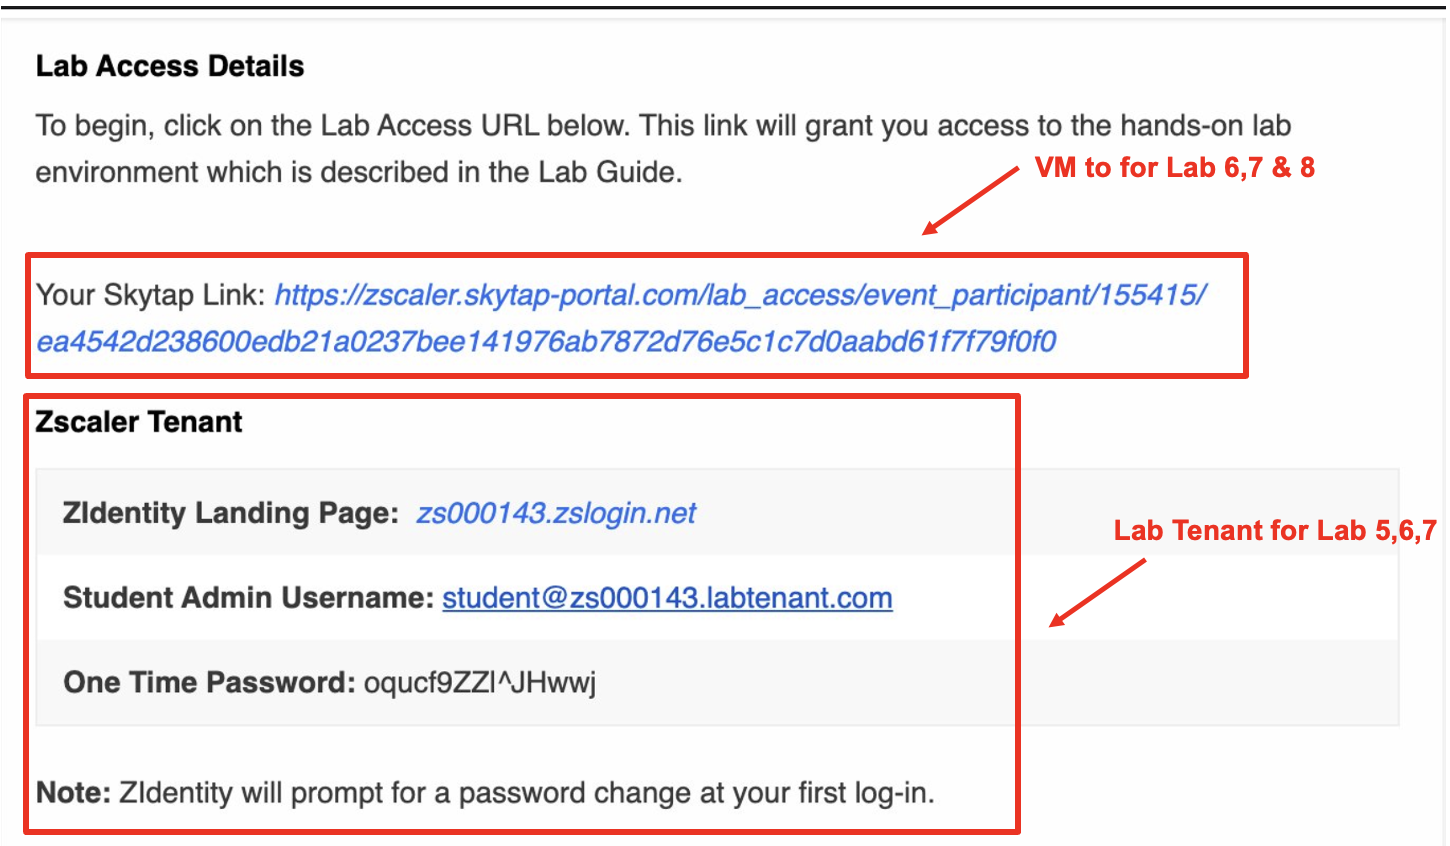
- Skytap URL — unique link to your lab VM (no password required)
- ZIdentity Landing Page — for Lab Tenant access
- Student Admin Username —
student@zs000XXX.labtenant.com - One Time Password — you will be prompted to change this on first login
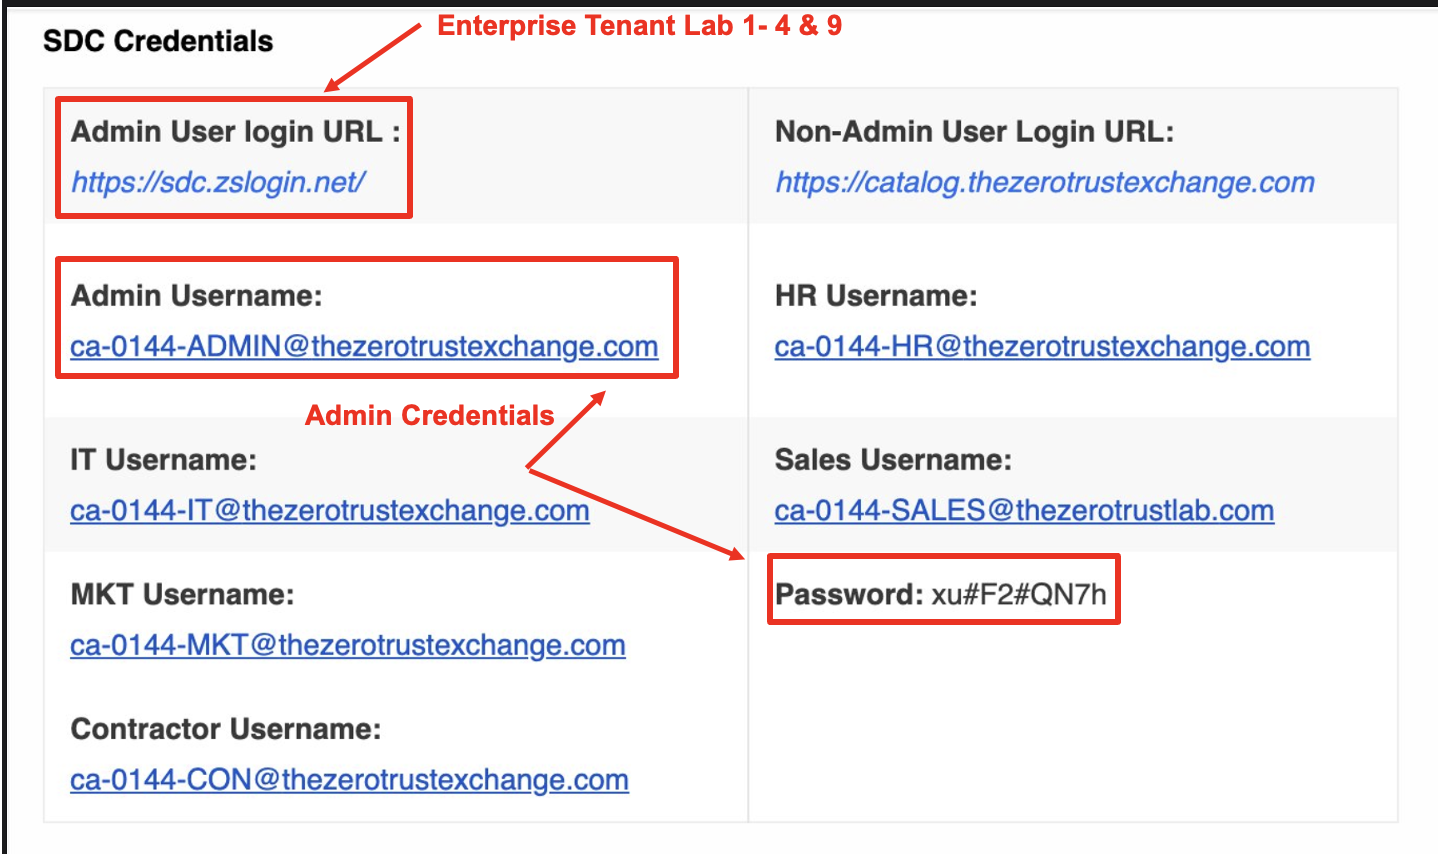
- SDC Credentials — for Enterprise Tenant access
Step 2 — Access the Lab VM
Click your Skytap URL from the email. The Windows VM launches automatically — no username or password required.
Verify the VM is ready:
- Zscaler Client Connector icon visible in the system tray
- File
Dataparity_Q2_2025_Workforce_Financial_Summary.docxis on the Desktop
Step 3 — Log Into the Enterprise Tenant (Modules 1 & 3)
From your laptop browser, navigate to https://sdc.zslogin.net/ and log in with your SDC Admin credentials from the email.
| Field | Value |
|---|---|
| Login URL | https://sdc.zslogin.net/ |
| Admin Username | ca-XXXX-ADMIN@thezerotrustexchange.com |
| Password | From your email |
Step 4 — Log Into the Lab Tenant (Module 2)
From your laptop browser, navigate to your ZIdentity Landing Page from the email (format: zs000XXX.zslogin.net) and log in with your Student Admin credentials. You will be prompted to set a new password on first login.
| Tenant | Used In | Access | Login URL |
|---|---|---|---|
| Enterprise Tenant (SDC) | Modules 1 + 3 | Read-Only | sdc.zslogin.net |
| Lab Tenant | Module 2 only | Read/Write | Your ZIdentity URL from email |
The facilitator will indicate when to switch tenants at the start of each module.
Part 2 — Configure Zscaler Client Connector (Lab Tenant)
These steps configure the Client Connector forwarding profile and app policy on the lab VM. This is required for Labs 6, 7, and 8 to enforce DLP policies on endpoint traffic.
All steps in Part 2 are performed in the Lab Tenant using the ZIdentity Client Connector tile. Make sure you are logged into the Lab Tenant before proceeding.
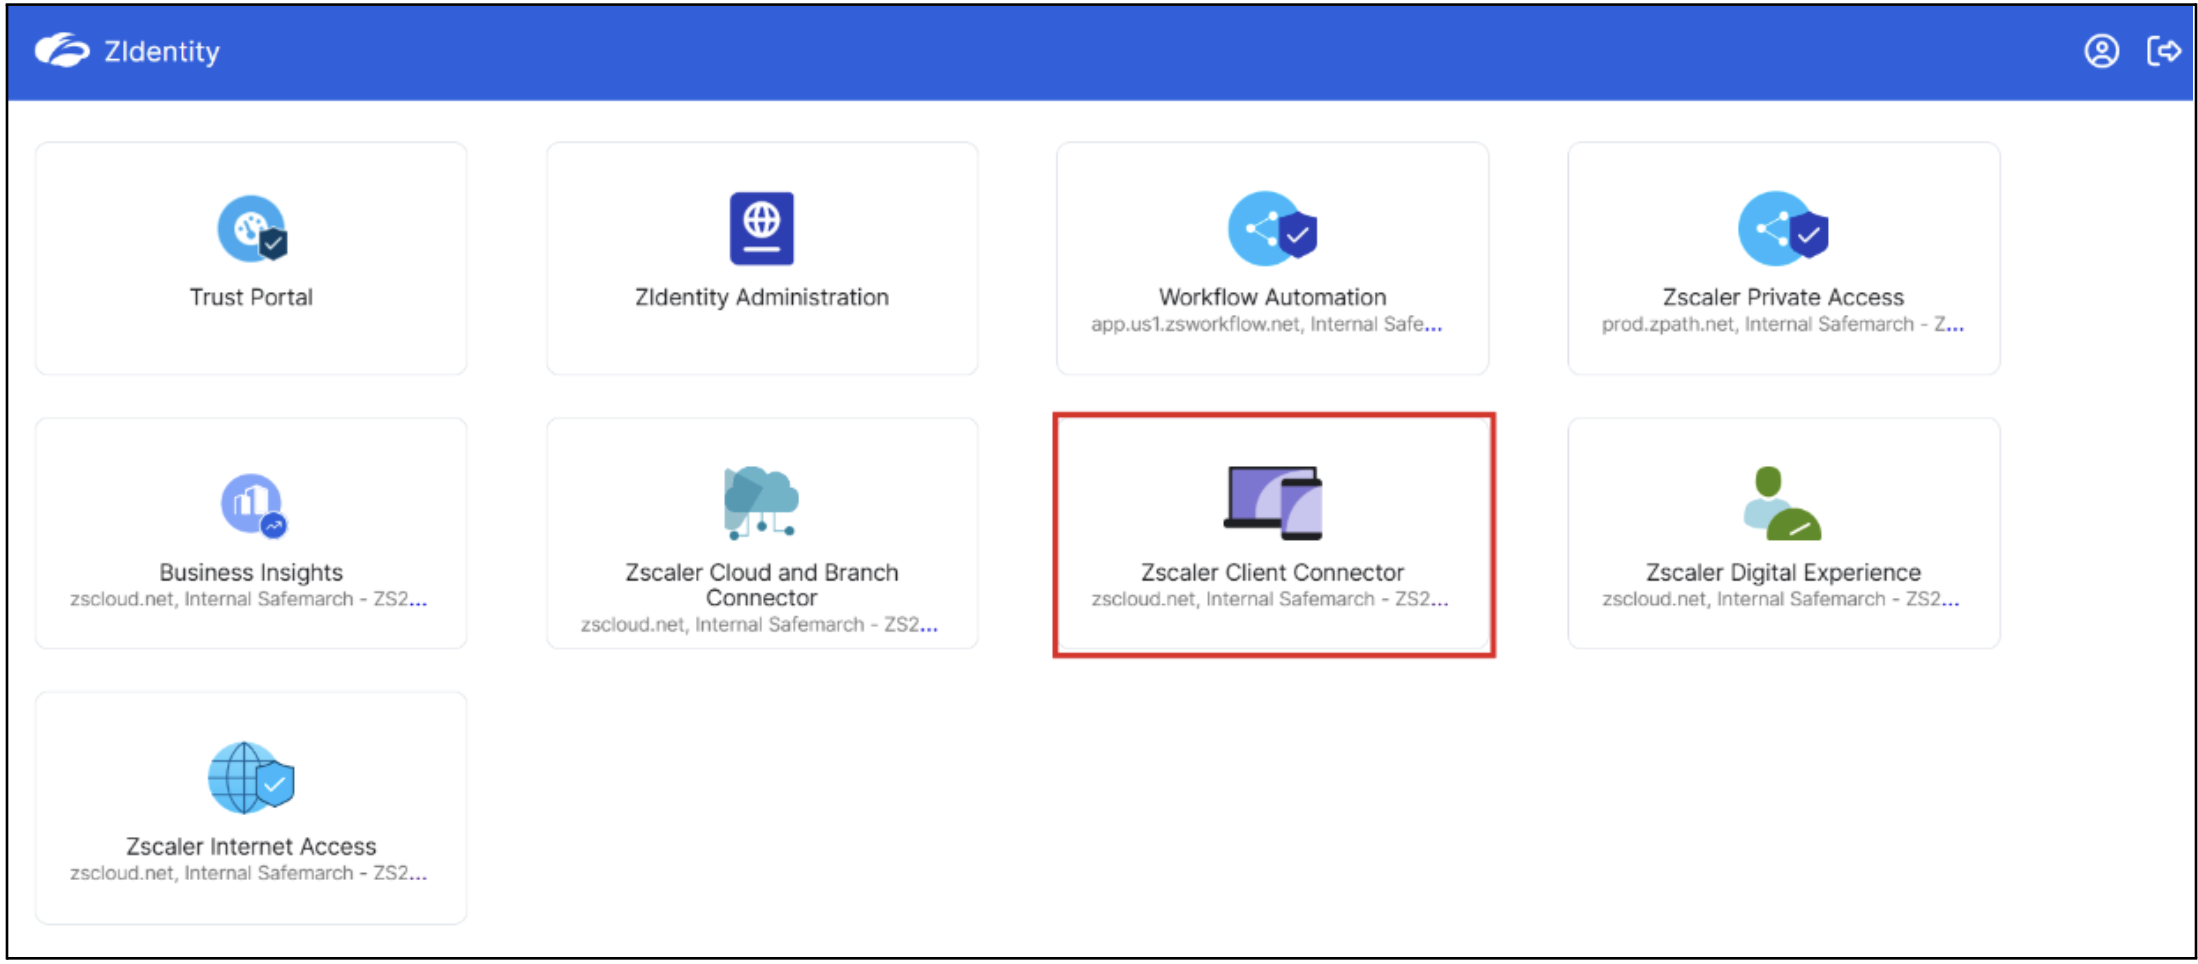
Step 5 — Log Into ZIdentity and Open Client Connector
On the Corp Client PC (VM), open Chrome and navigate to your ZIdentity Landing Page. Log in with your Student Admin credentials, then click the Zscaler Client Connector tile.
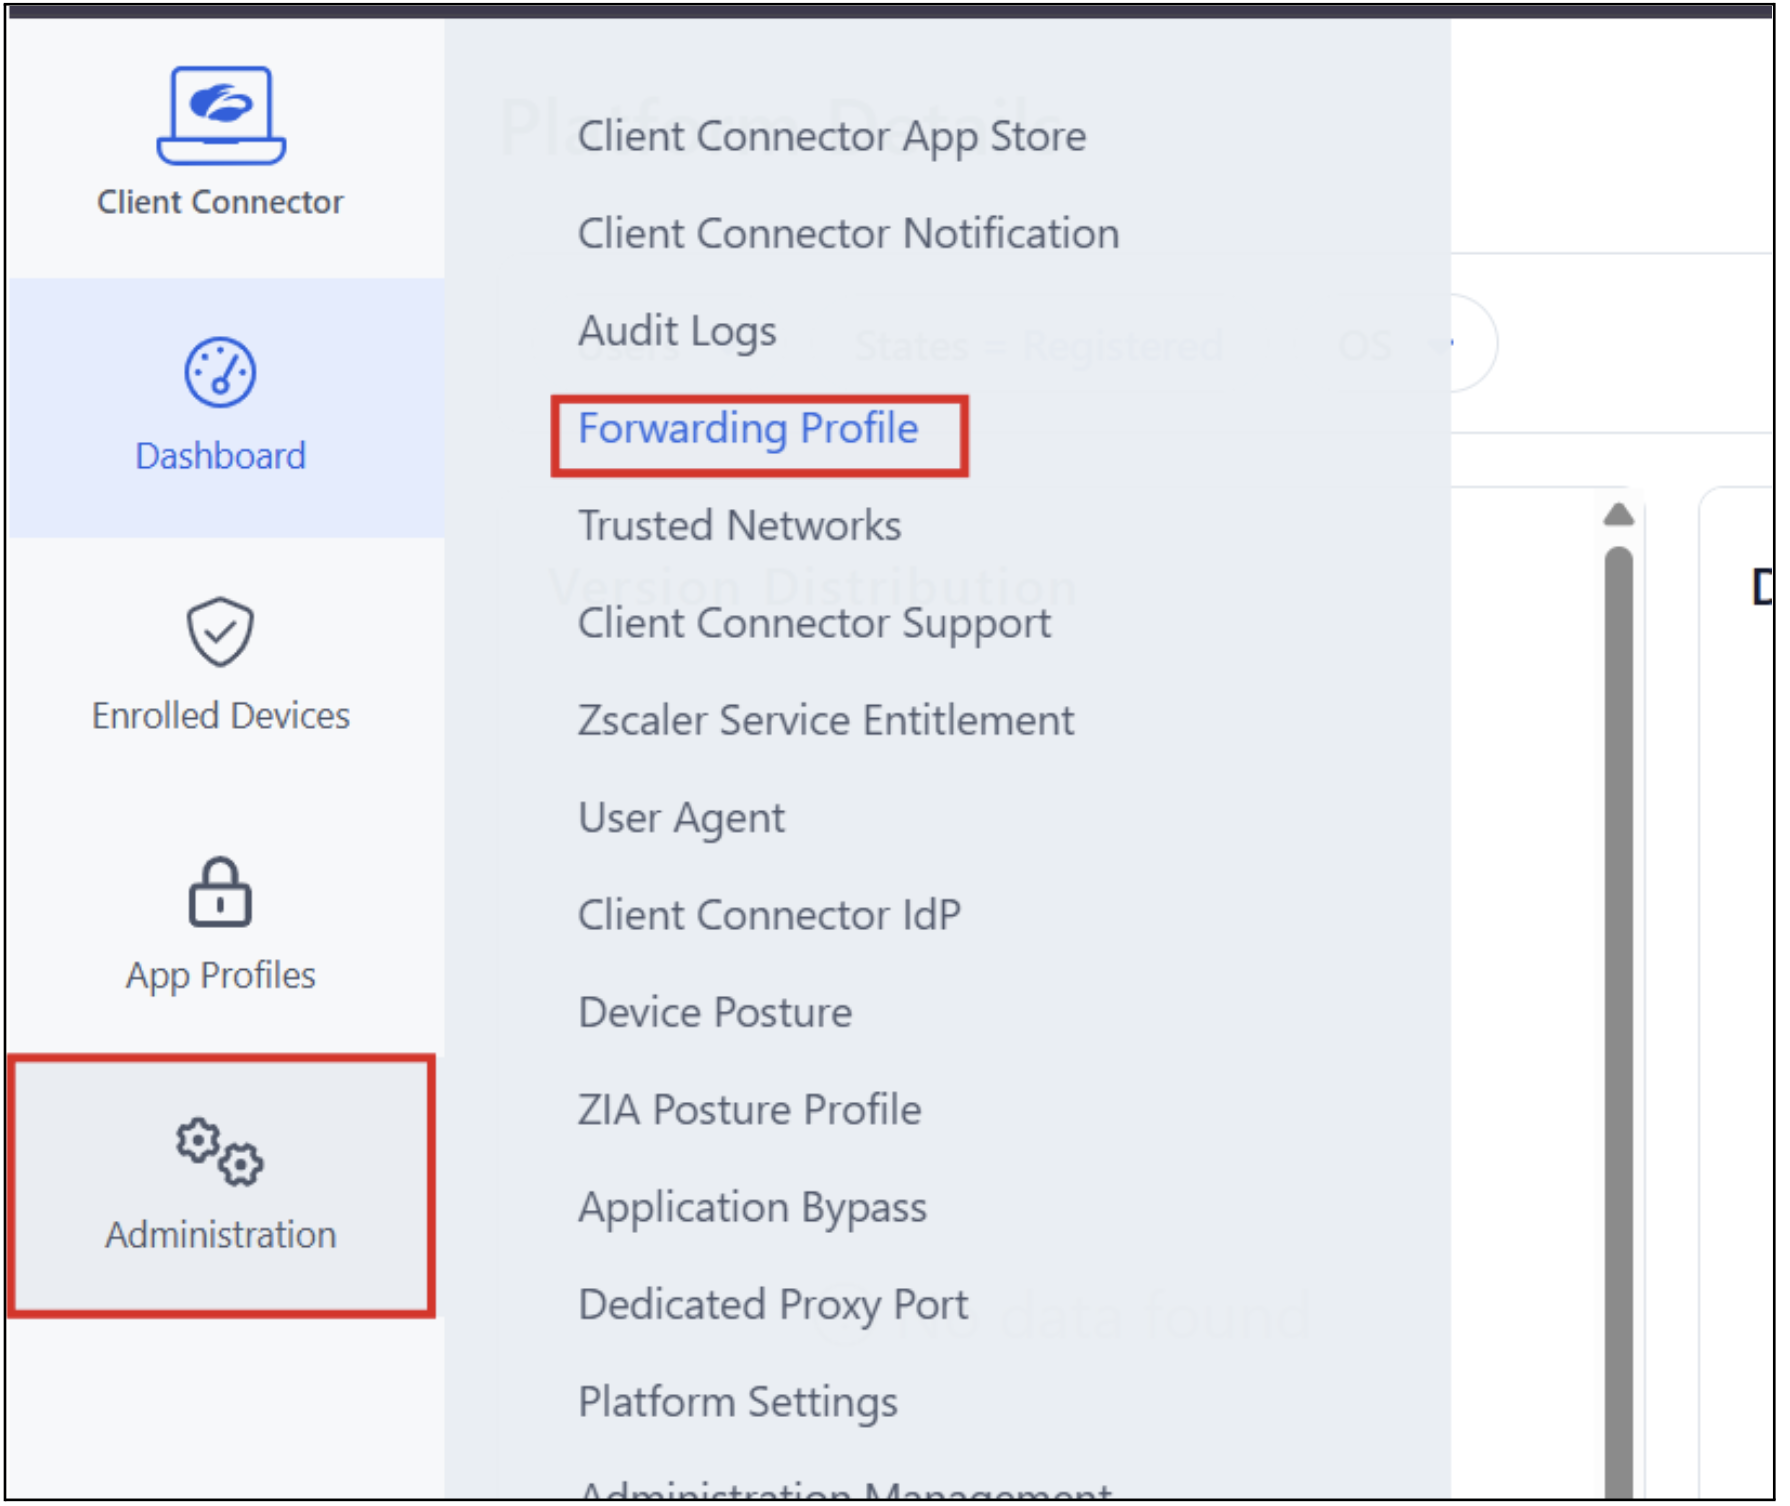
Step 6 — Navigate to Forwarding Profile
Navigate to:
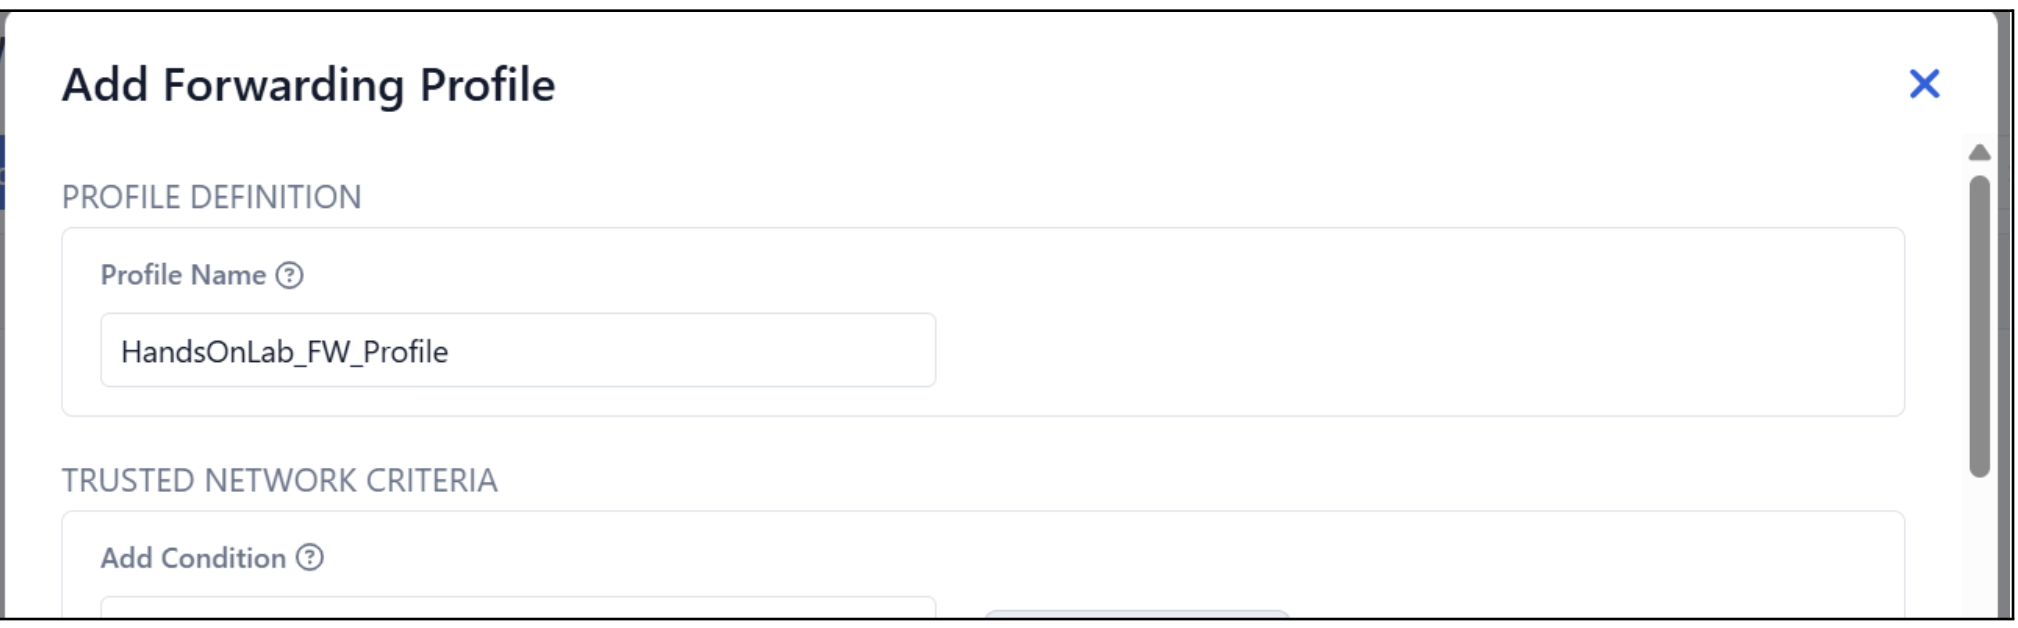
Step 7 — Add Forwarding Profile
Click Add Forwarding Profile and configure:
- Name:
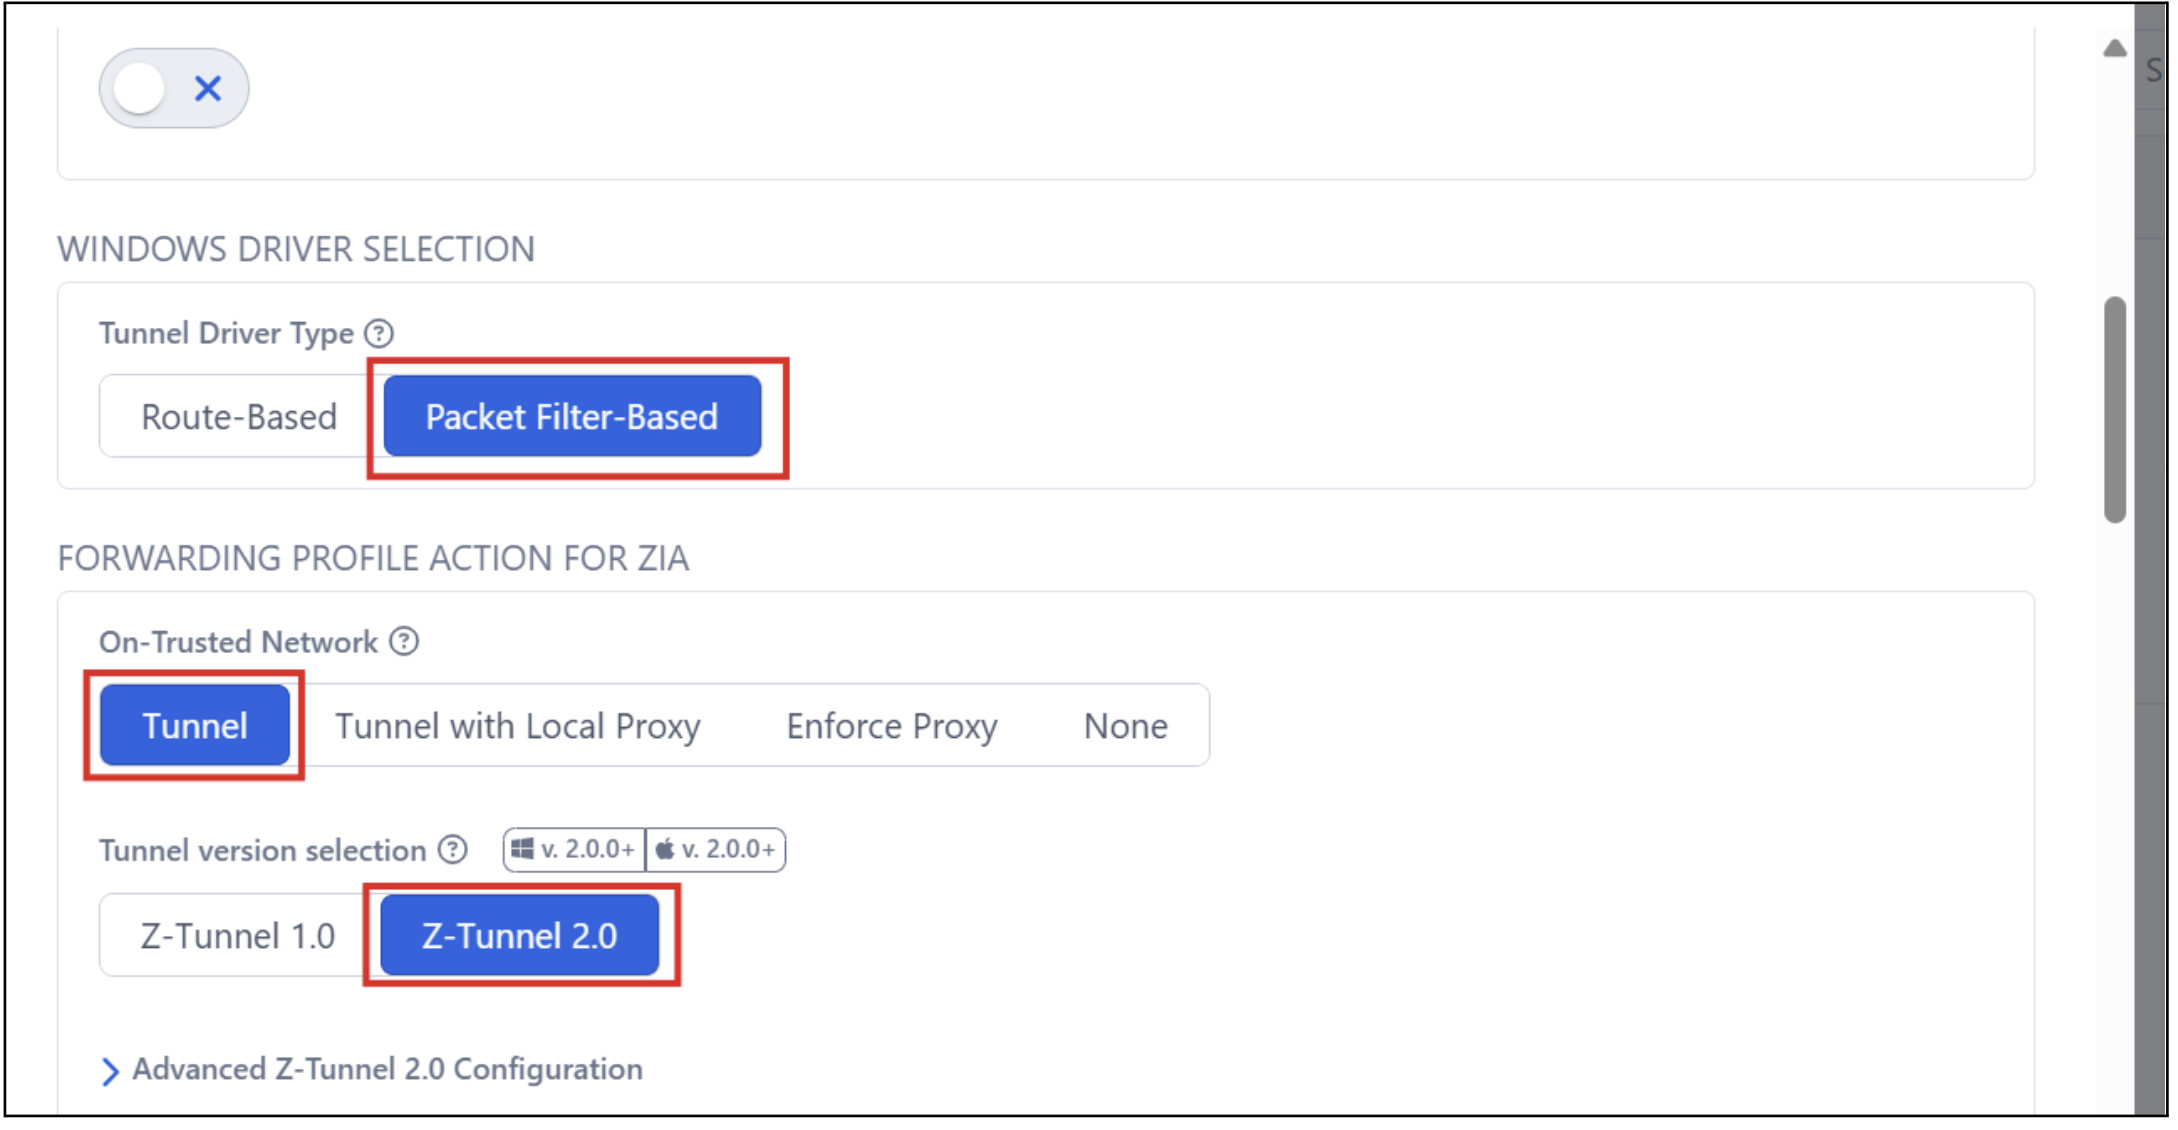
HandsOnLab_FW_Profile - Windows Driver Selection: Packet Filter Based
Step 8 — Configure ZIA Tunnel Settings
In the FORWARDING PROFILE ACTION FOR ZIA section:
- On-Trusted Network: Tunnel
- Tunnel version: Z-Tunnel 2.0
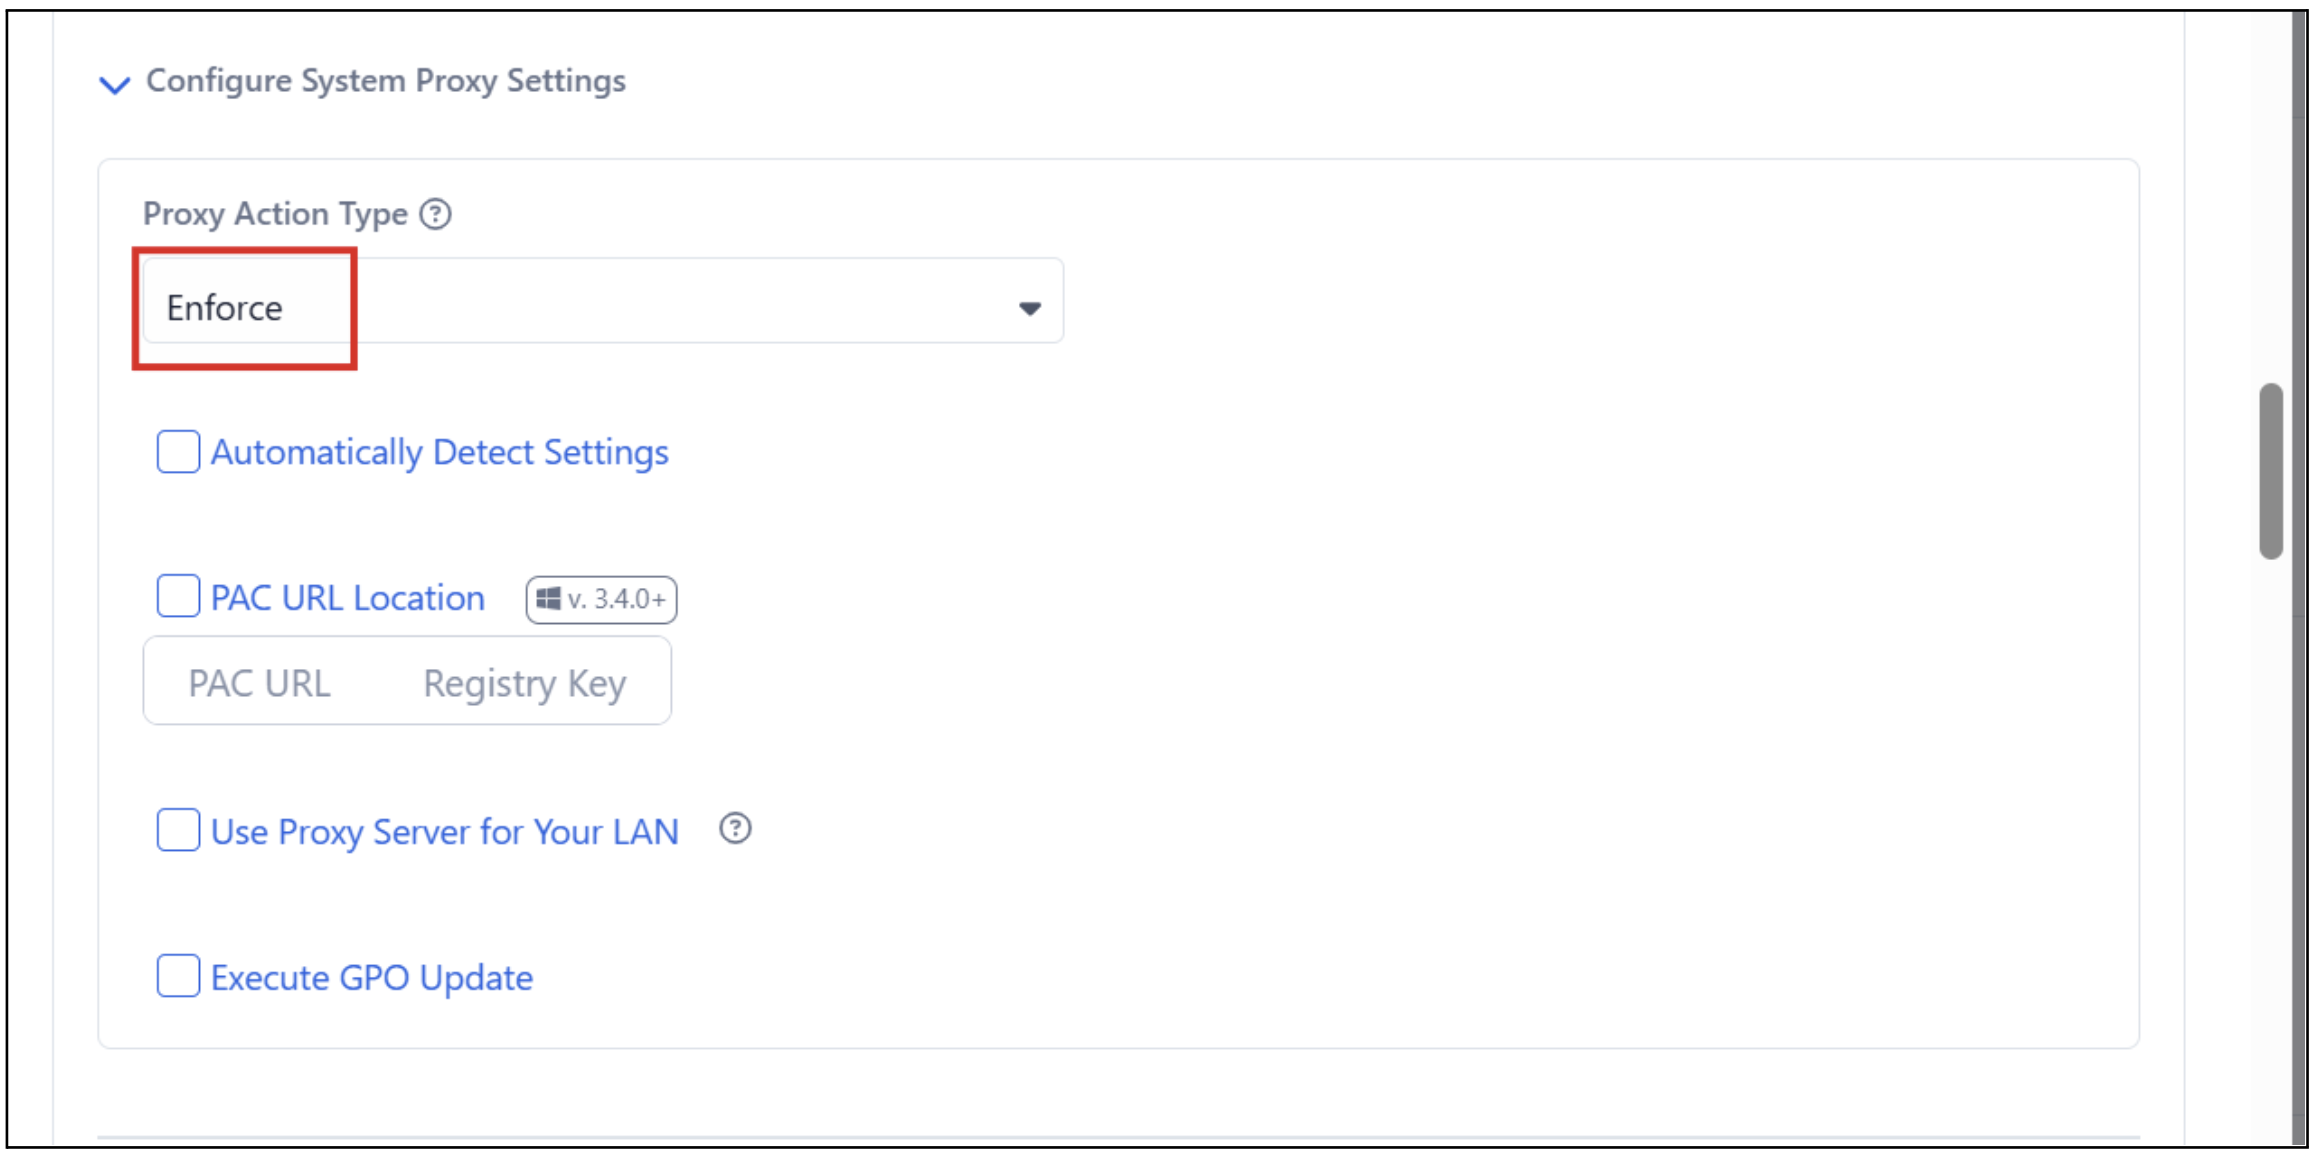
Step 9 — Configure System Proxy Settings
Scroll down and expand Configure System Proxy Settings:
- Configure System Proxy Settings: Enforce
- Ensure all options are unchecked
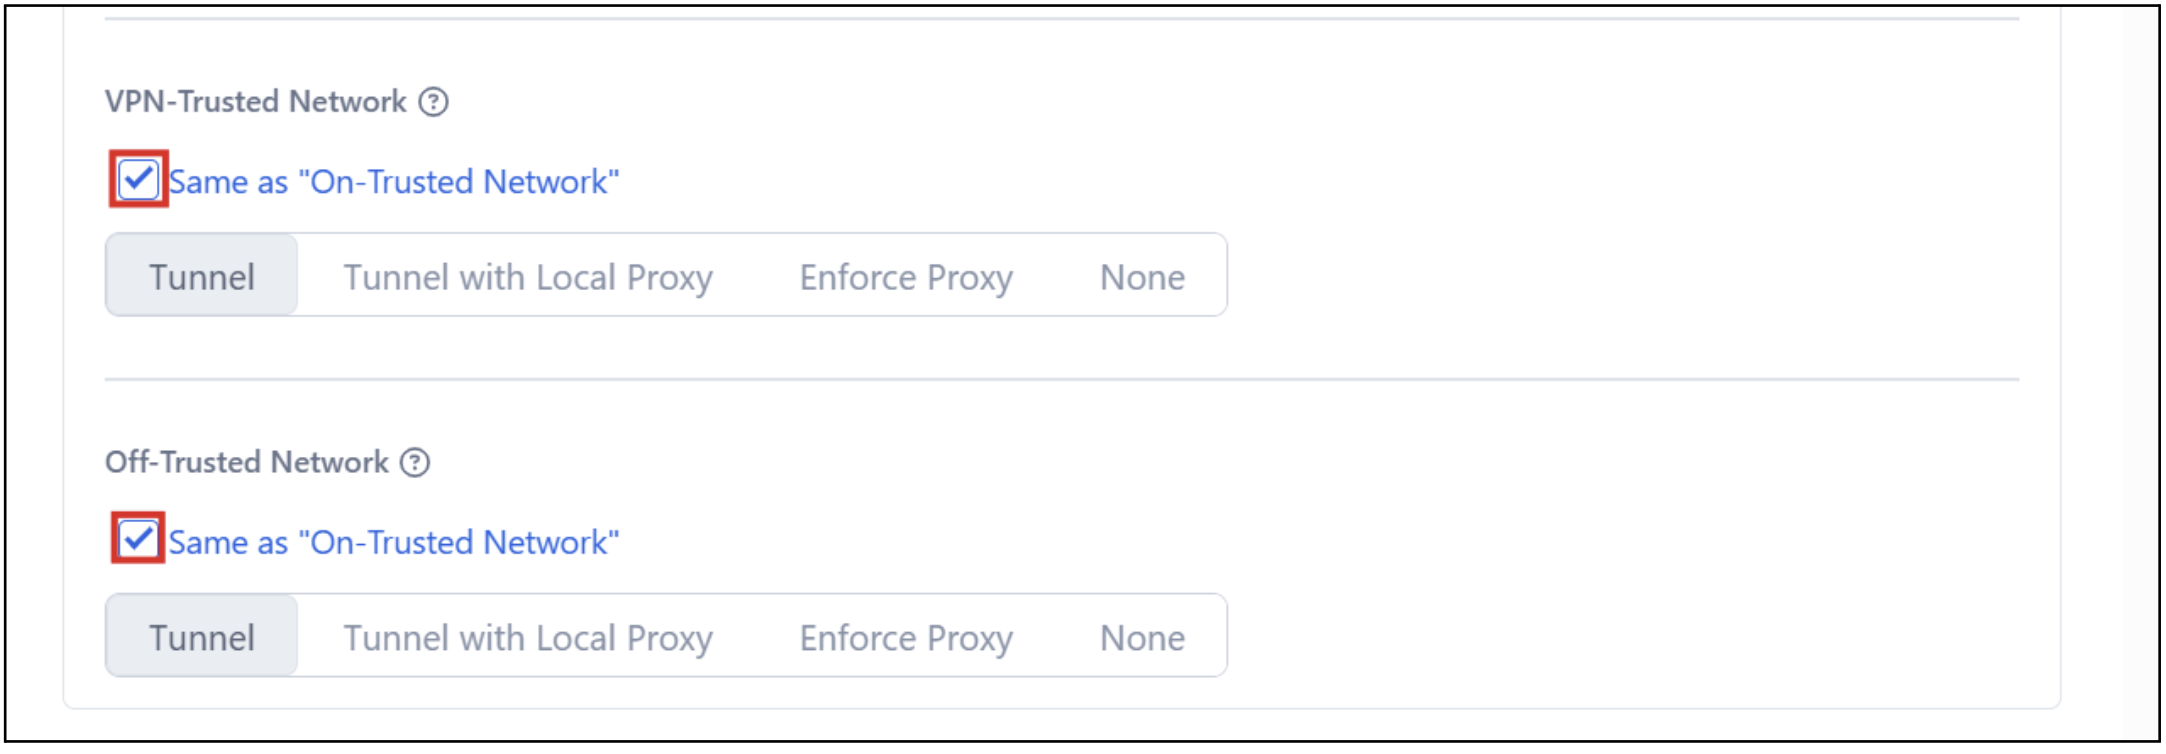
Step 10 — Configure VPN and Off-Trusted Network
- VPN Trusted Network: Check Same as "On-Trusted Network"
- Off Trusted Network: Check Same as "On-Trusted Network"
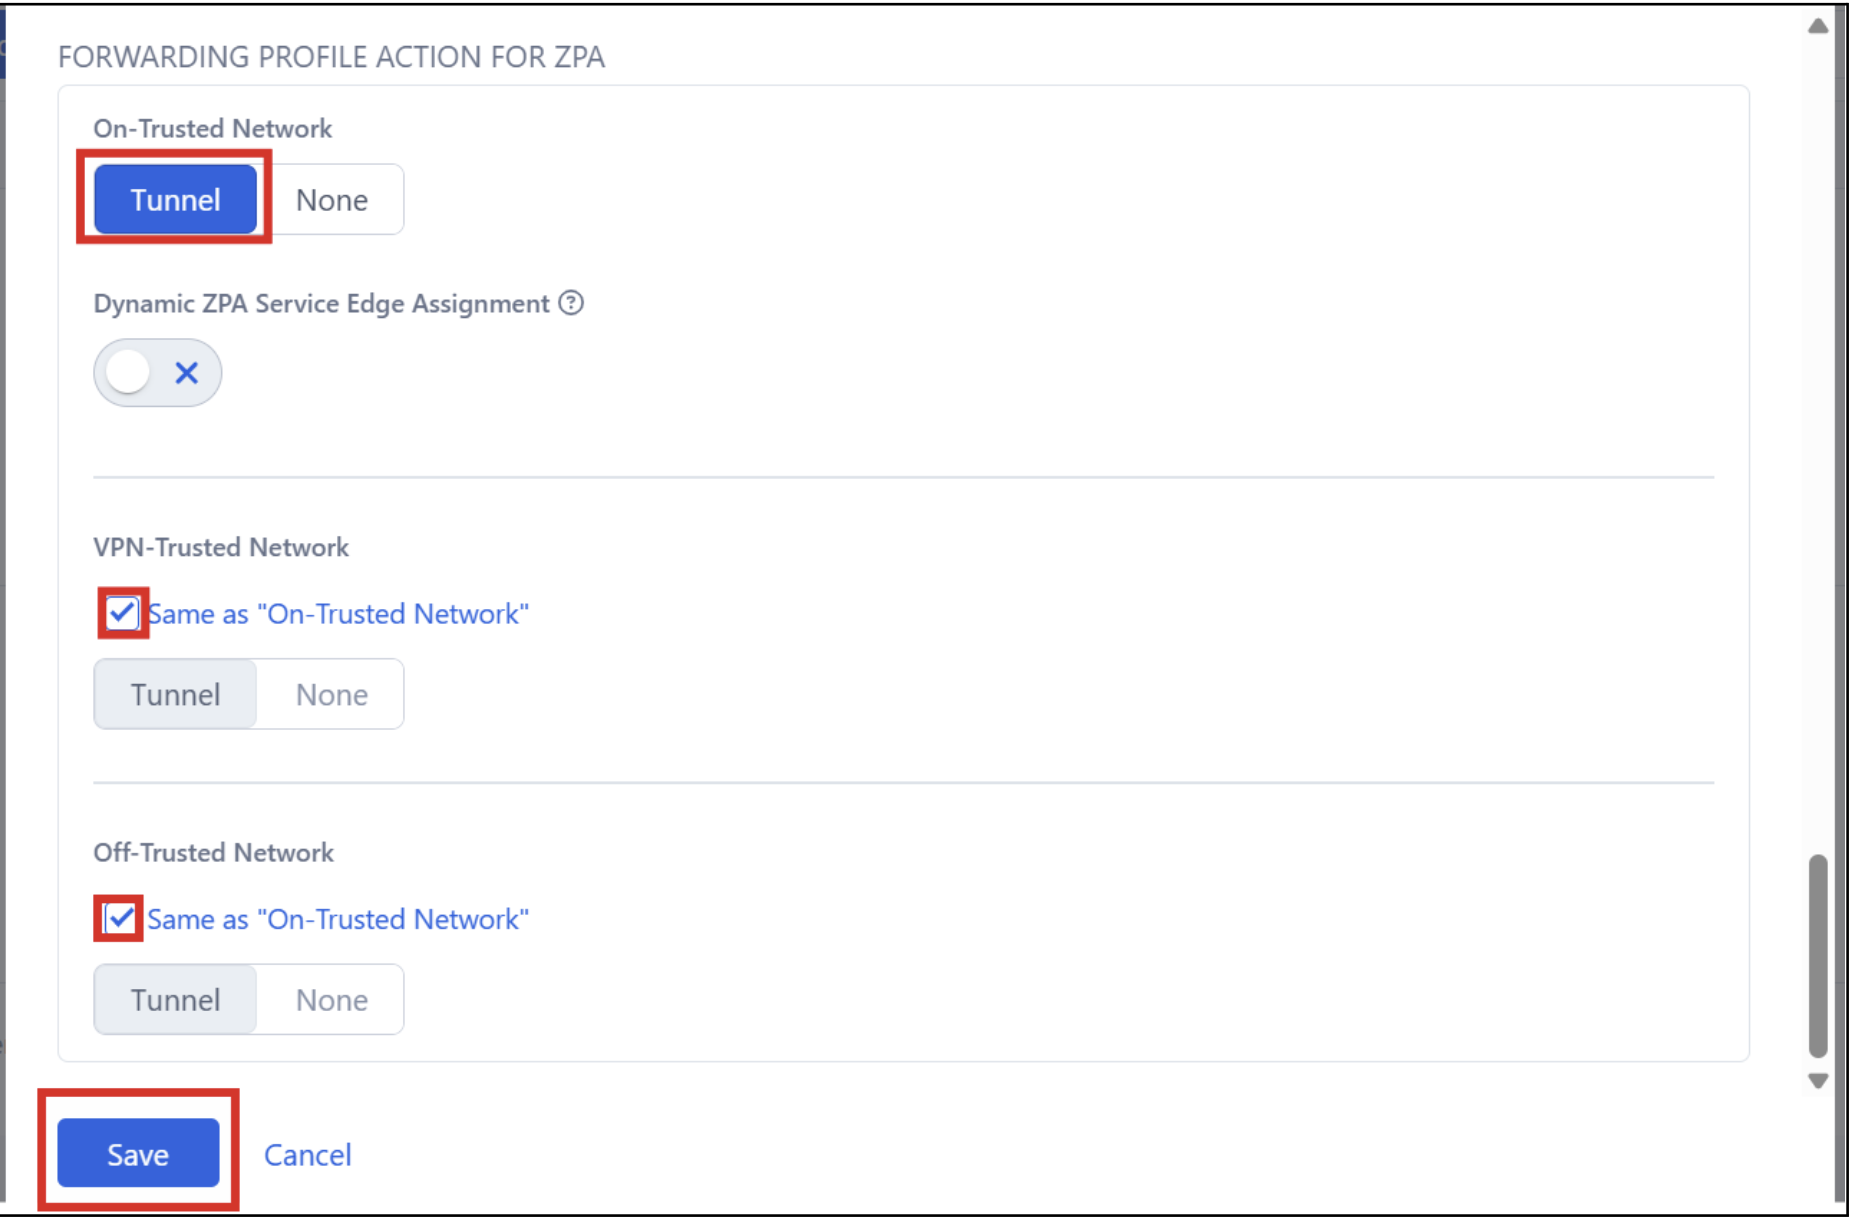
Step 11 — Configure ZPA Forwarding Profile
In the FORWARDING PROFILE ACTION FOR ZPA section:
- On-Trusted Network: Tunnel
- VPN-Trusted Network: Same as "On-Trusted Network"
- Off-Trusted Network: Same as "On-Trusted Network"
Click Save.
Step 12 — Navigate to App Profiles
Navigate to:
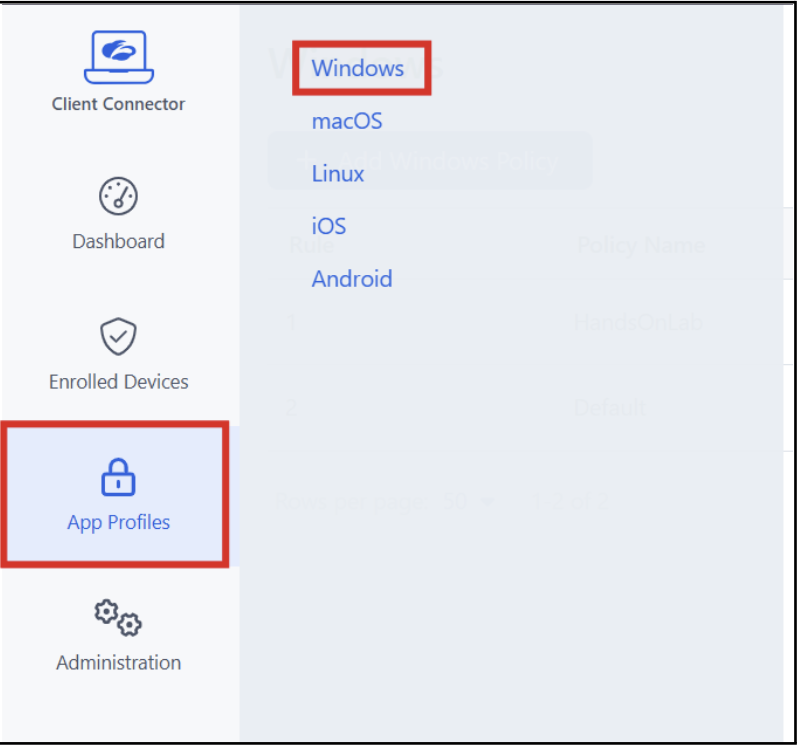
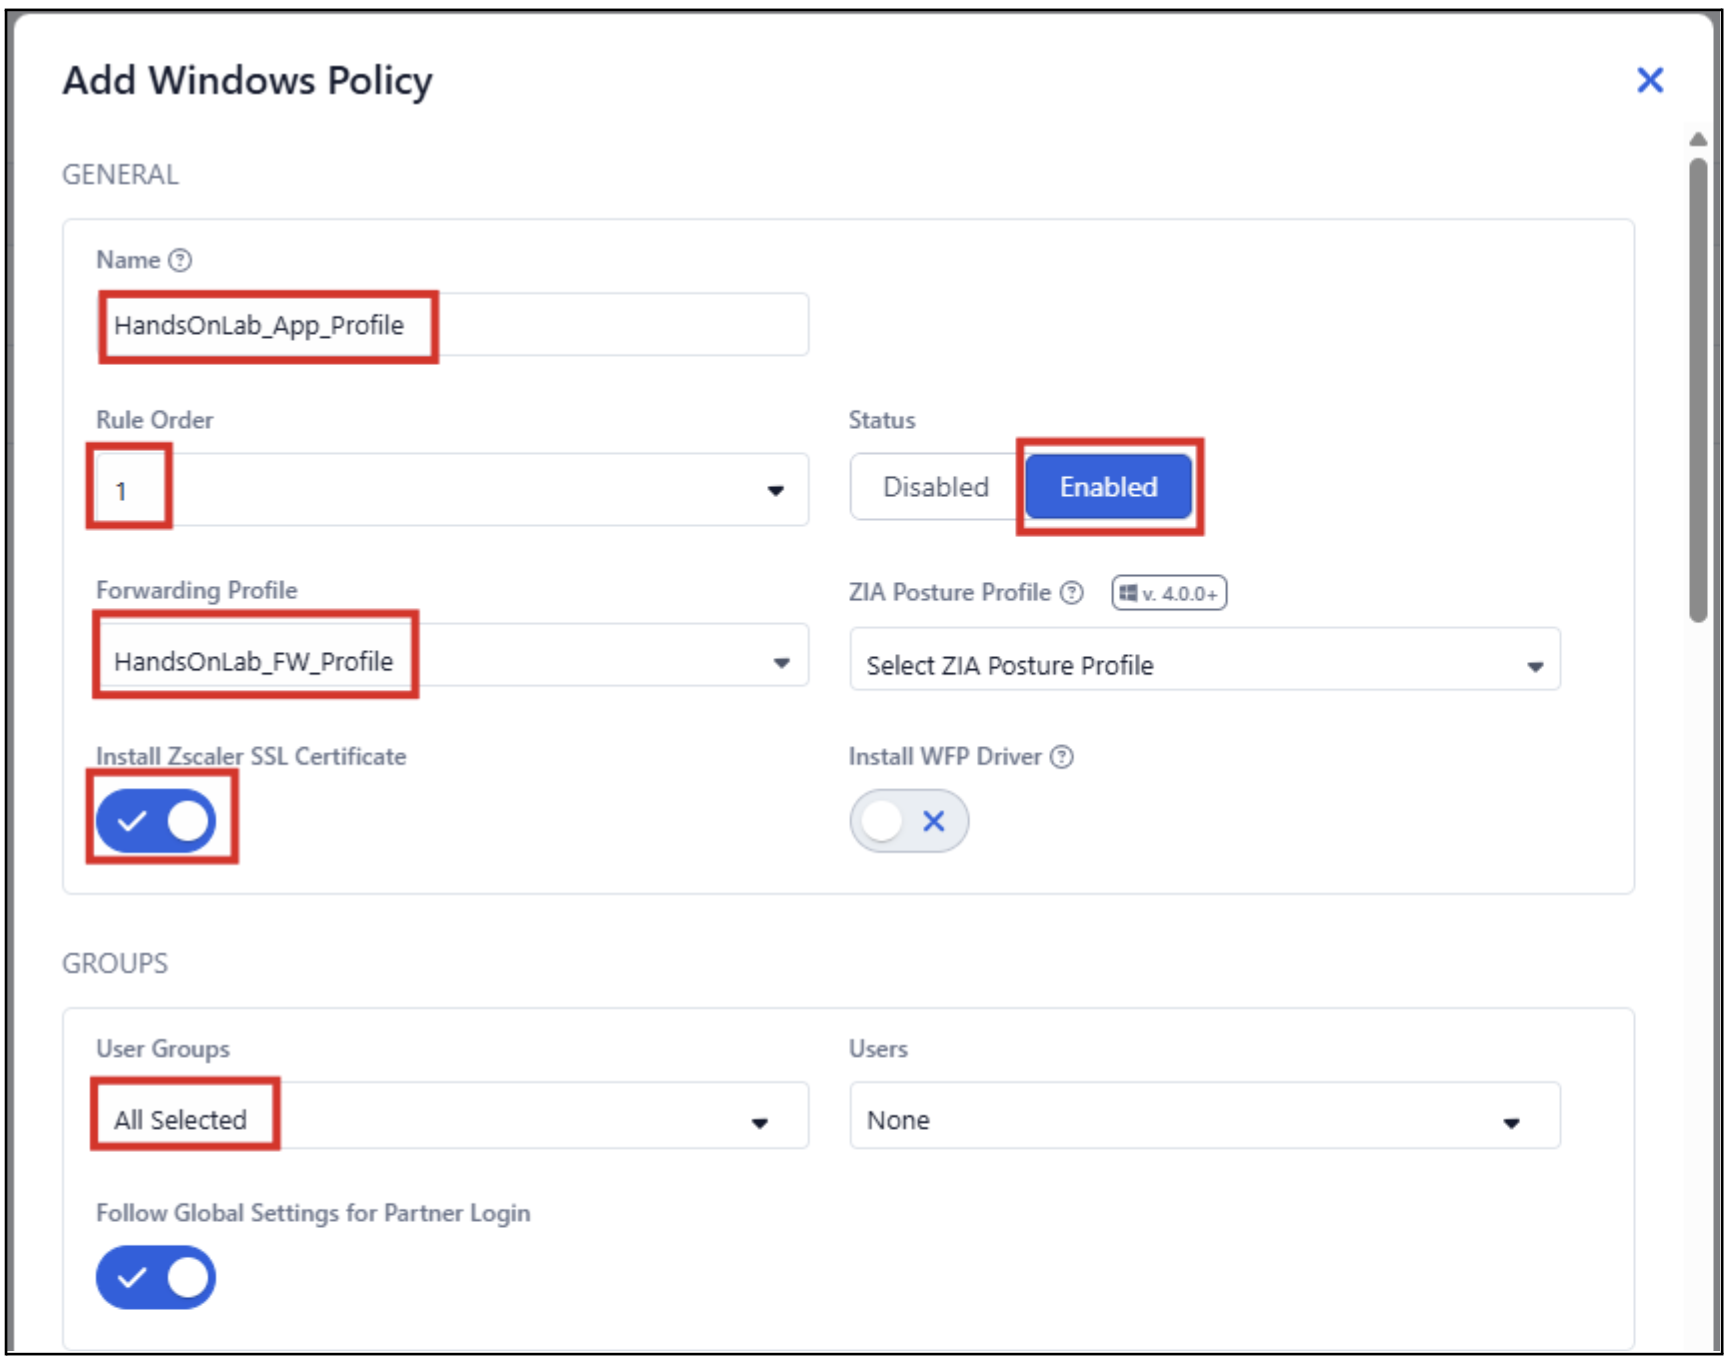
Step 13 — Add Windows App Policy
Click Add Windows Policy and configure:
- Name:
HandsOnLab_App_Profile - Rule Order: 1
- Status: Enable
- Forwarding Profile:
HandsOnLab_FW_Profile - Install Zscaler SSL Certificate: On
- User Groups: Select All → Done
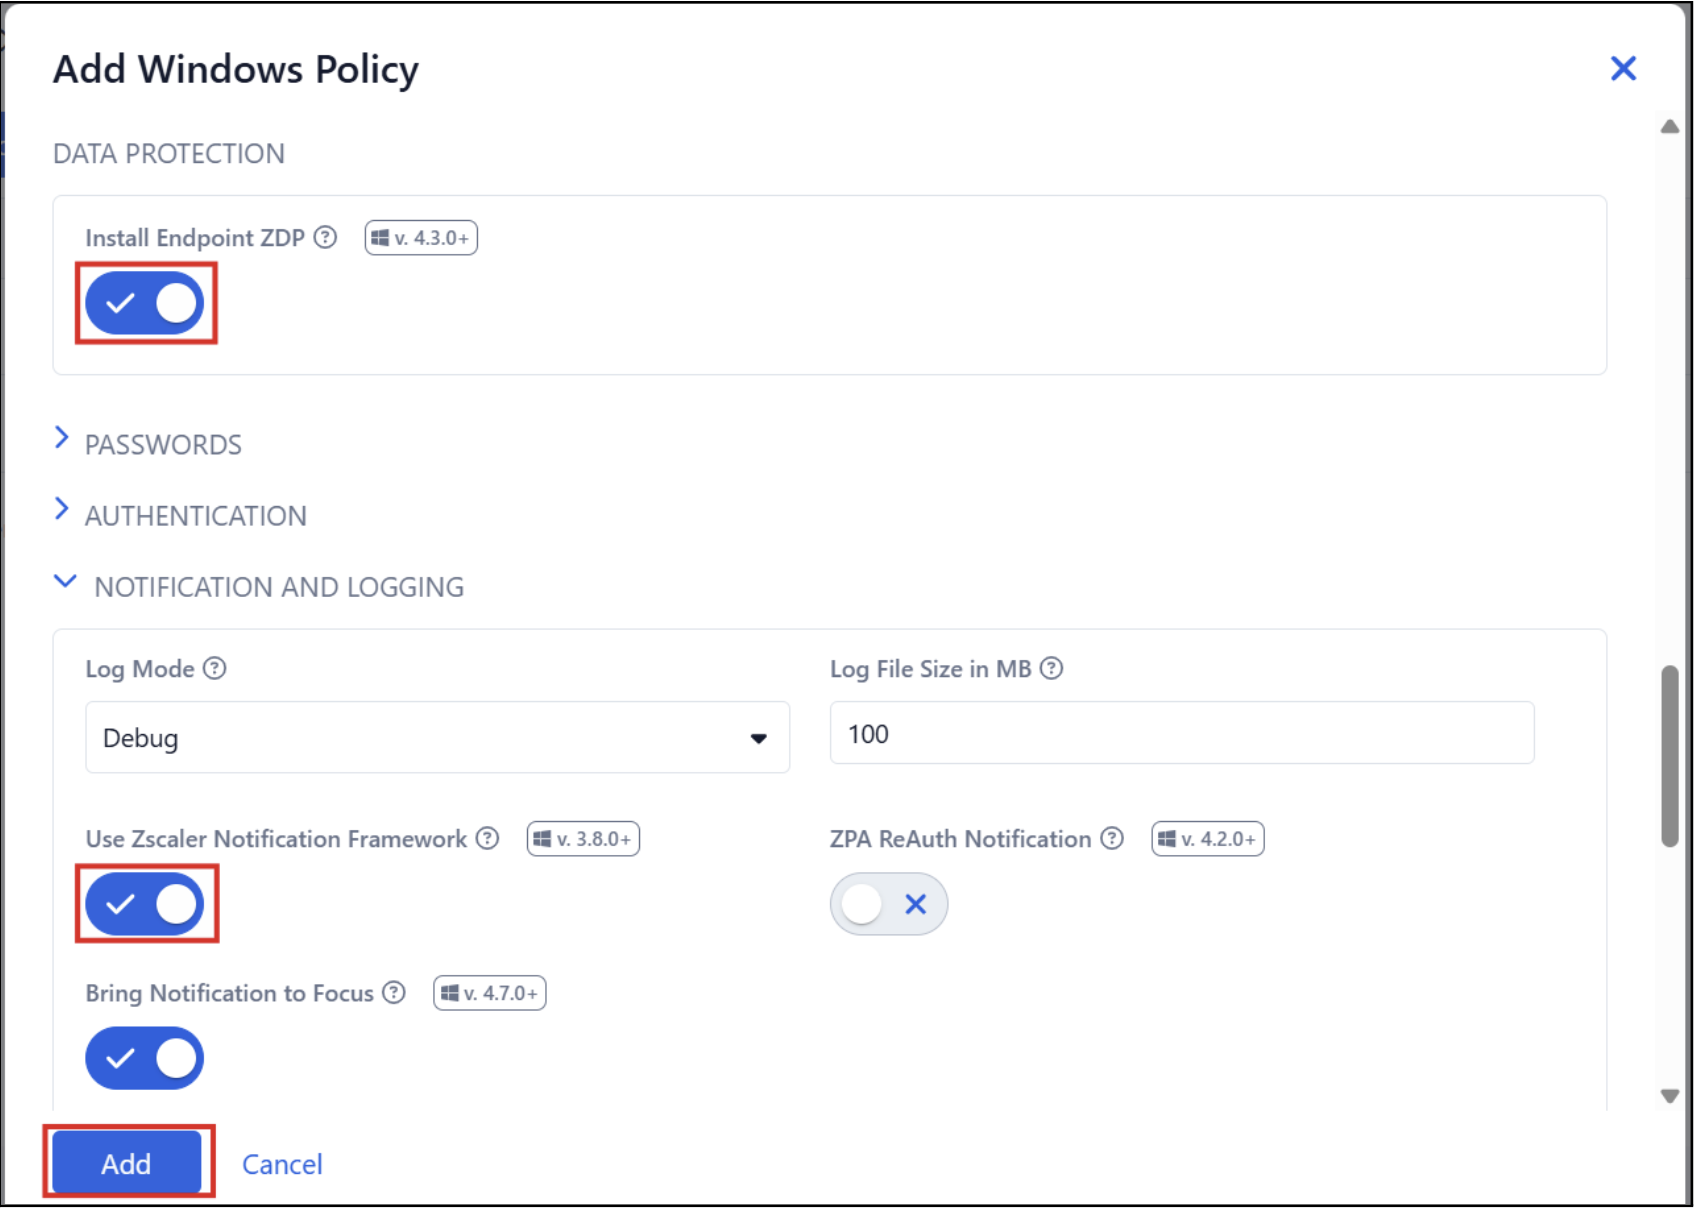
Step 14 — Enable Data Protection / Endpoint DLP
In the same Windows App Policy:
- Data Protection: Install Endpoint ZDP
- Expand Notification and Logging:
- Use Zscaler Notification Framework: Enable
- Bring Notification to Focus: Enable
Click Add.
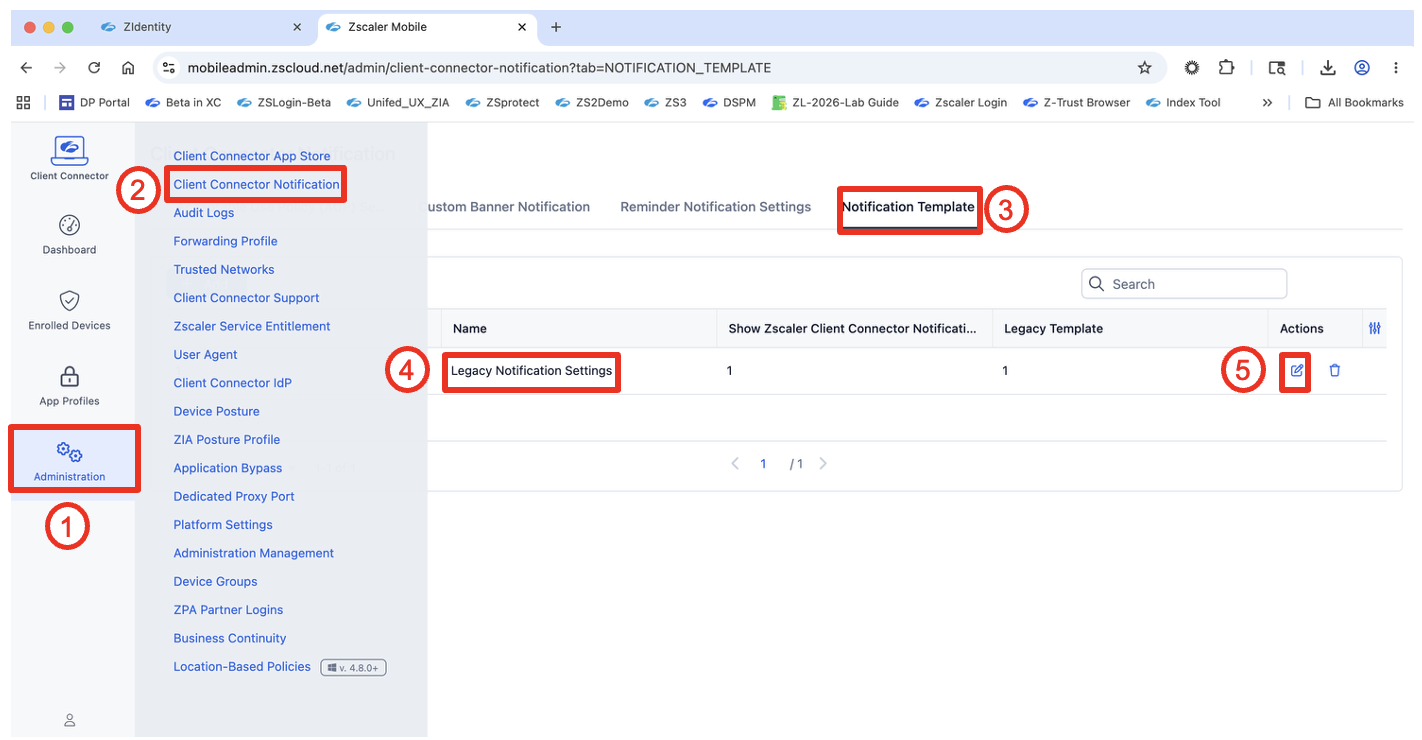
Step 15 — Enable Client Connector Notifications
Navigate to:
You can either edit the existing Legacy Notification Settings template (click the edit icon) or create a new template using the + Add Notification Template button. Either approach works — just ensure the template is saved and active before proceeding.
Click the edit icon next to Legacy Notification Settings.
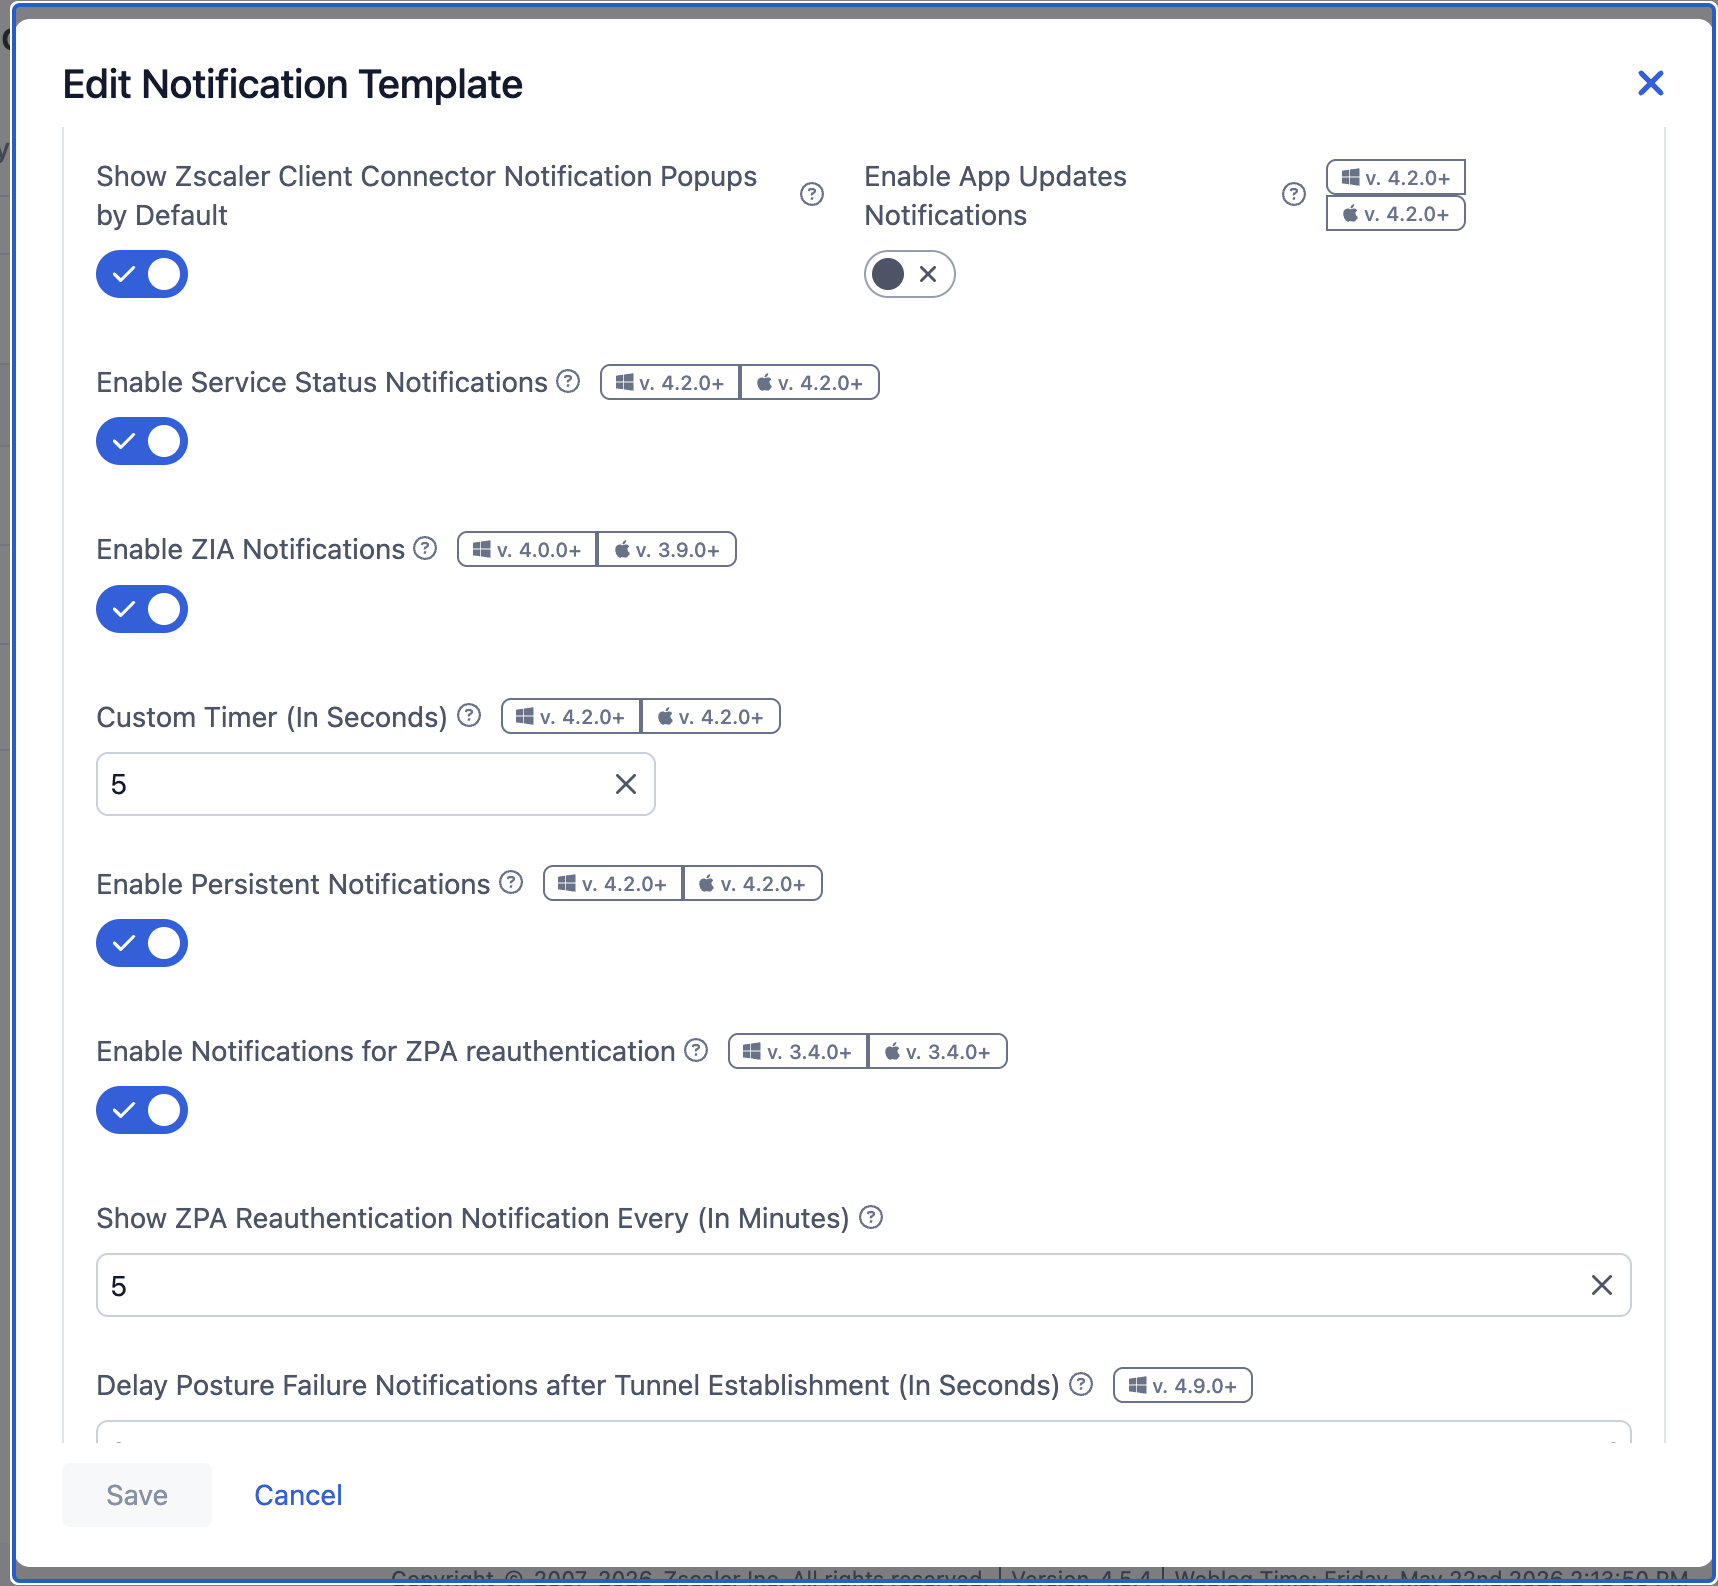
Configure the following settings in the Edit Notification Template dialog:
| Setting | Value |
|---|---|
| Show ZCC Notification Popups by Default | Enabled |
| Enable Service Status Notifications | Enabled |
| Enable ZIA Notifications | Enabled |
| Enable Persistent Notifications | Enabled |
| Enable Notifications for ZPA Reauthentication | Enabled |
| Custom Timer (In Seconds) | 5 |
Click Save.
Steps 5–15 configure the forwarding profile and enable endpoint DLP notifications. This is required before Labs 6, 7, and 8 — without these steps, the ZCC block notifications will not appear on screen when Kevin's actions are blocked. Allow 5–7 minutes for all students to complete these steps.
Part 3 — Navigate to Experience Center (Module 2)
For all Module 2 configuration tasks (Labs 5, 6, and 7), Alex uses the Experience Center — Zscaler's unified console — rather than the standard admin portal.
After logging into the Lab Tenant, click Experience Center in the banner at the top of the ZIdentity page.
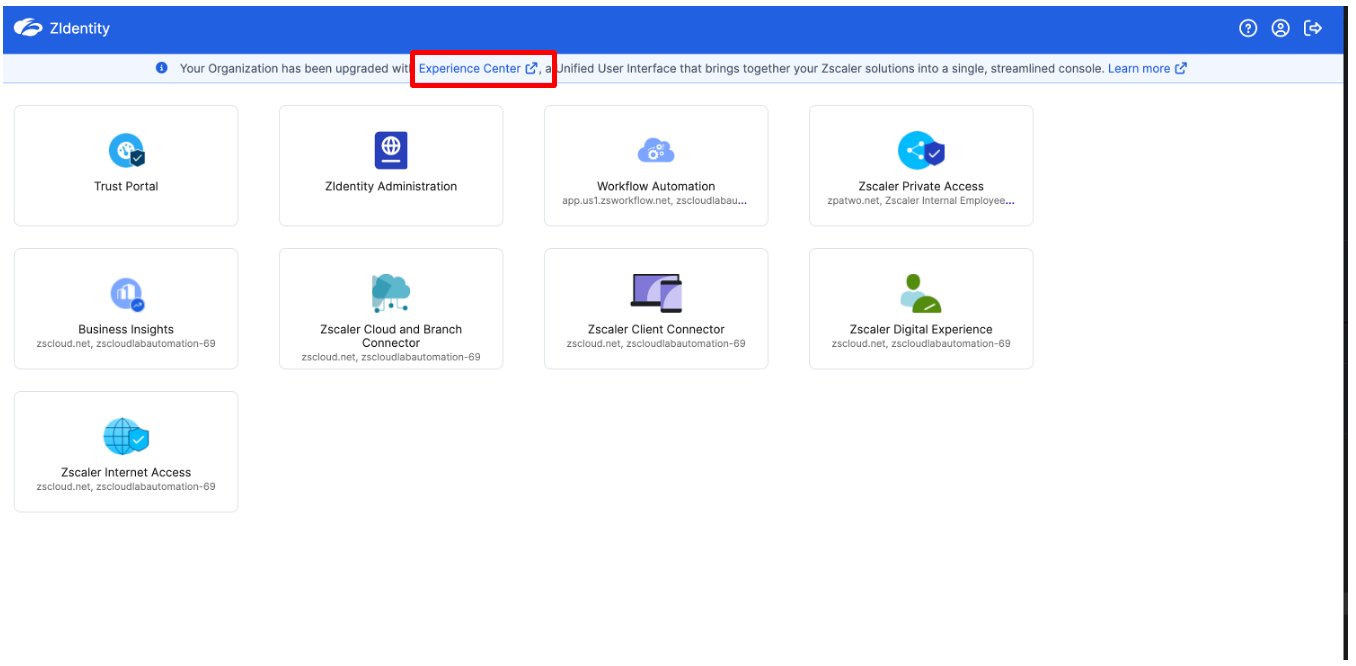
Callout — Click Experience Center in the blue banner at the top
The Experience Center provides a unified view of all Zscaler products and is the primary console for configuring DLP policies, engines, and resources in Labs 5, 6, and 7.
Part 4 — Setup VM and Login to Zscaler Client Connector (ZCC)
Step 1 — Login to the VM
Locate the Skytap URL in your lab access email and click it. The Windows VM launches automatically — no username or password required.
If you log off or need to log back in manually, use username: student / password: Admin-123!

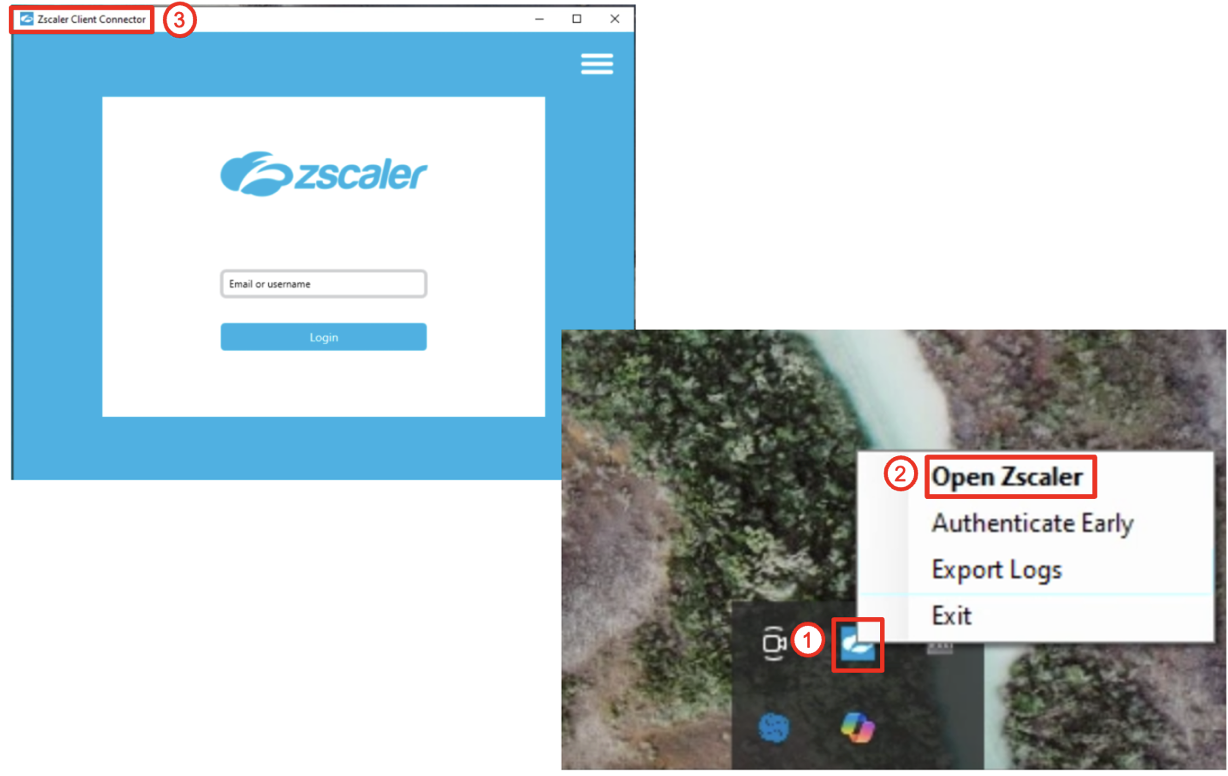
Step 2 — Open and Login to Zscaler Client Connector
Locate the ZCC icon in the system tray (bottom right of the taskbar) ①, right-click it, and select Open Zscaler ②. The Zscaler Client Connector window opens ③.
Use your Lab Tenant credentials to log in — the same username and password you set up in Part 3.
Use your updated password, not the one-time password from the email. ZIdentity prompted you to change it on first login — use that new password here.
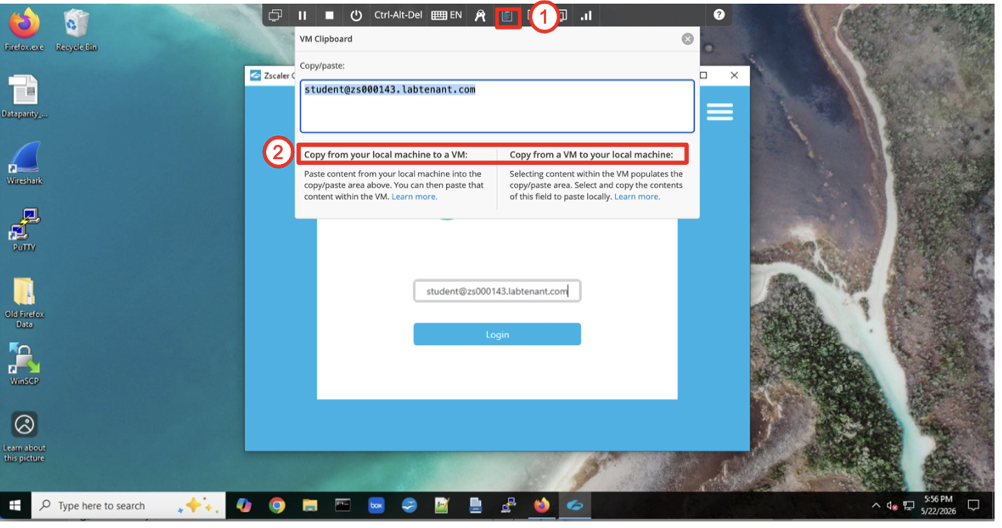
Tip — Copy/Paste from your local machine to the VM:
Use the VM Clipboard tool in the SkyTap toolbar at the top of the VM window ①. Paste your credential into the clipboard field, then paste inside the VM using Ctrl+V. This works in both directions — local to VM and VM to local ②.
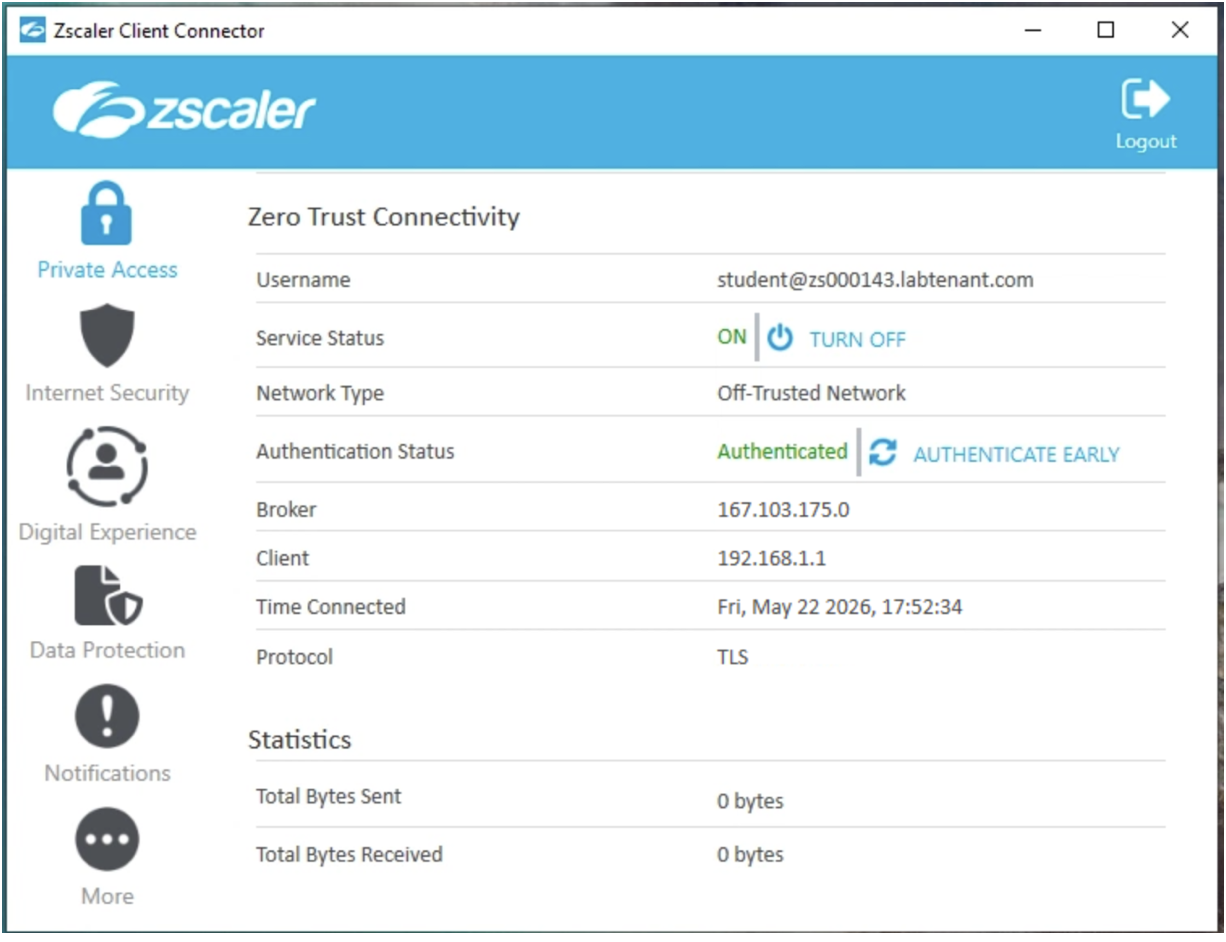
Step 3 — Verify All Modules Are Active
Once logged in, the ZCC dashboard opens. Confirm the following:
- Authentication Status: Authenticated (green)
- Service Status: ON
- All modules (Private Access, Internet Security, Digital Experience, Data Protection) are visible and active
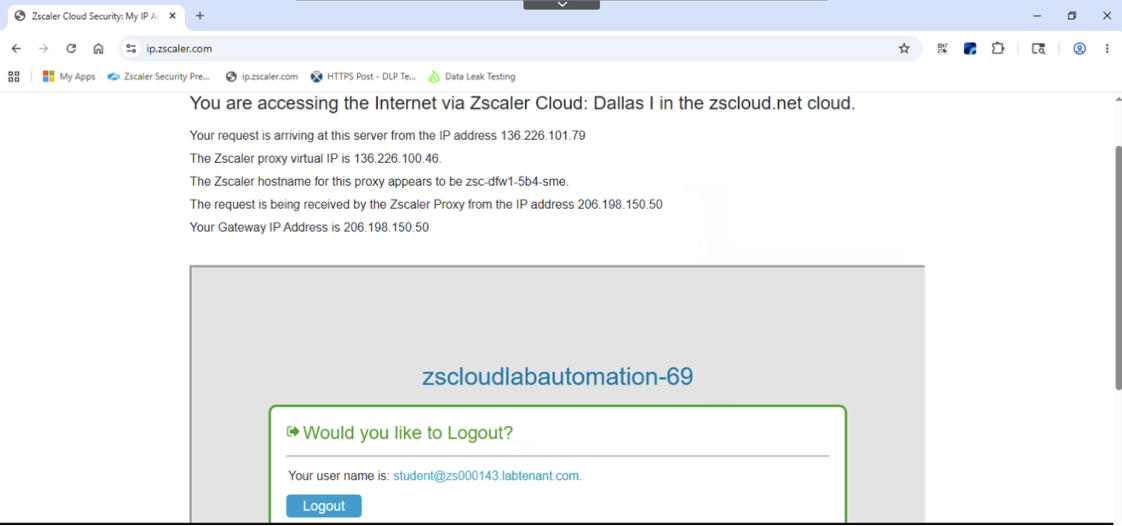
Step 4 — Verify Traffic Is Being Steered to Zscaler
Open a browser inside the VM and navigate to https://ip.zscaler.com. The page should confirm your traffic is passing through the Zscaler Zero Trust Exchange and display your Zscaler proxy details.
Notepad++ is pre-installed on the VM — no installation needed. It is ready to use for Lab 7.
Quick Reference — All Credentials
| What | URL | Username | Password |
|---|---|---|---|
| Enterprise Tenant (Admin) | https://sdc.zslogin.net/ | ca-XXXX-ADMIN@thezerotrustexchange.com | From email |
| Lab Tenant | ZIdentity URL from email | student@zs000XXX.labtenant.com | One Time Password from email |
| Browser DLP Extension (Lab 8) | Tenant: dlpdemo | Same as Enterprise Tenant Admin | Same as Enterprise Tenant |
| Lab VM | Skytap URL from email | student | Admin-123! |
| Zscaler Client Connector (VM) | N/A | Same as Lab Tenant Admin username | Same as updated Lab Tenant password |
The ca-XXXX and zs000XXX numbers in screenshots throughout this lab guide were captured during preparation. Use the credentials from your email.
Before moving to Lab 1, do a quick show-of-hands:
- Can everyone access the Enterprise Tenant at sdc.zslogin.net? ✋
- Can everyone access their Lab Tenant? ✋
- Has everyone completed the forwarding profile setup? ✋
- Is Zscaler Client Connector logged in and all modules active on the VM? ✋
- Does ip.zscaler.com confirm traffic is tunneled through Zscaler? ✋
Resolve any blockers before proceeding — all subsequent labs depend on these steps being complete.